How to Update Branding Images for your Chime Deployment
Customize The Look Of Your Tenant
If you want to update the way Chime looks to your users when they are in a chat session, this guide will show how to update the images used for messages sent in chat sessions and on your Chime tenant’s web interface. If you are looking for how to update the Image for the Chime V5 Teams App we also have this guide on Steps to Customize (Apply Branding) Teams App in Teams Admin
Navigate to Media Library
First thing we will want to do is find where these images are stored.
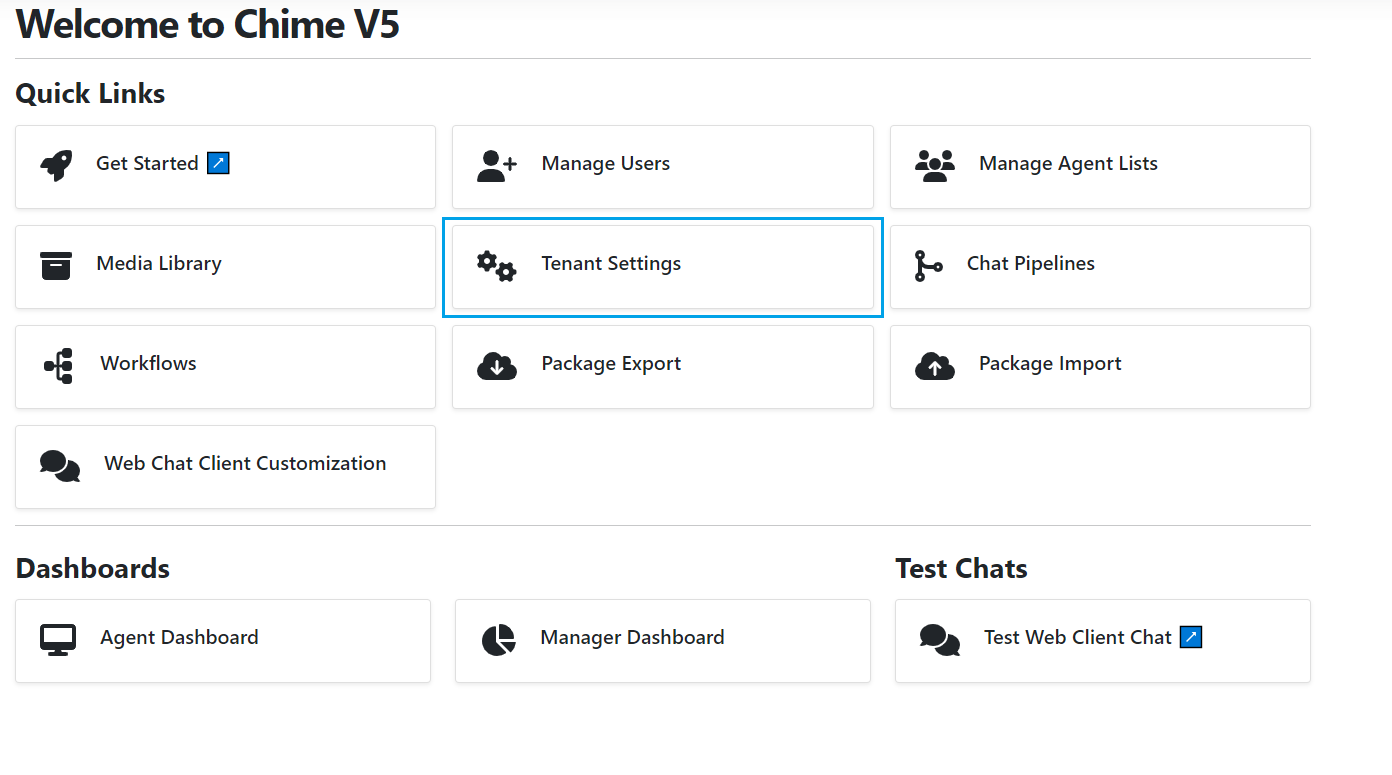
Navigate to Admin, then Media Library (either from the dashboard page, or from the left-side menu Chime Advanced > Media Library)

Select the _branding folder from the Media Library menu. In this folder you should see images that are important for branding. In this guide we will cover the most important ones:
card-logo.png
favicon.ico
logo.png
tenant-logo.png

Favicon icon
The favicon icon will be what your Agents, Managers, and Admins see on the Chime web portal as the icon at the top of the page/tab. This can be updated to be more in line with your organizations icon
Tenant Logo
The tenant-logo will display in the top left of the header on each page while on the Chime web portal. Typically this is an org or helpdesk logo image to tie the branding of your Chime tenant over to your organization.
Card Logo
The card-logo.png image is used primarily on adaptive cards sent by Chime over to the end-user or the Agent during a chat session. Here are all the spots it can show up by default:
Tenant Settings > Chat Commands and Events
Install Welcome Message
Generic Help Message
Greeting Command Message Before a Chat
Greeting Command Message During Chat
Pipeline Adaptive Cards
Welcome Card Form when user stars a chat
FAQ Lookup Results
User Feedback Card
Pipeline Help Message
Pipeline Invalid Command Message
Chat Routing to Agent Cards
Guest Initial Waiting Message
Still Searching for Agent Message
Guest Connected to Agent
Agent Connected to Guest
Agent Left Chat
Guest Left Chat
How to Update the Install Welcome Message for the Teams App
Customize Or Disable Your Welcome Message
This guide will cover how a Teams Admin can configure what message an end user sees when Chime V5 is installed on their Teams Client. The default message is a general welcome message to Chime, but you will likely want to update it to fit the branding and feel of your Chime use case. Additionally, you also have the option to disable this message so users are not messaged by the app until they choose to use if for the first time.
Navigate to the Admin Dashboard, then Chime Settings and Tenant Settings.
Configure your tenant settings to set your chat application settings - you must be a Chime administrator to configure this setting
Configure your chat application setting
Click on the Chat Commands and Events tab.
For the Install Welcome Message option, choose if you want this to be enabled or disabled using the setting Disable Welcome Message.

Set the initial welcome message that Microsoft Teams will send to the employee when the app is added
These welcome messages are configured as adaptive cards - they can be updated using our adaptive card editor
If you want to update the message, click on the Editor tab, then Pop out card Editor option.

Launch the adaptive card editor - to configure the MS Teams first use message
The first use message is sent when the MS Teams app is pushed across your organization - during onboarding and deployment
In the editor, click on the text in the middle to select it.
On the right-side of the editor, there will be Element Properties that show up, under the Text option, you should be able to edit any of the existing text to suit your Chime use-case. If you would like to add any additional elements here are some Adaptive Card samples that can help with learning how to use them Adaptive Card Samples and Templates.

Adaptive cards are easy to use, powerful, and great for our chat sessions
Our chat workflows use Microsoft Adaptive Cards to collect information during the chat, send chat responses, and prompt for chat UI.
Once you are done updating the card, click Save Card.
When if prompts you to close the card designer, click OK.
Back on the Chime Admin area, click the Save button in the bottom left.
Here is an example of what this welcome message will look like by default in the Chime Teams app.

Adaptive cards look great in Microsoft Teams and are used throughout our chat application
Here an adaptive card is delivering a simple welcome message as an employee starts a chat session to get some help.
How to approve the Chime V5 Chat app
Authorize installation for users in your organization
Deploying our enterprise chat application across your organization will allow any, or maybe just a subset, of employees to use our chat application to search Chat FAQs, use Chat Q&A services, Chat with AI, and route chat requests to service desk agents. In other words, solve employee problems and issues using chat :)
Since Chime is a chat service available from the Microsoft Teams Store, the organization’s MS Teams Admin will need to make the application available organization wide and update MS Teams App Policies.
In this guide, we will cover how to make the Chime V5 Teams app available to install for users in your organization. This will require a Teams Admin to complete the following steps to ensure that your organization will be able to use the Chime V5 app propperly.
In the Microsoft Teams Admin Center navigate to Teams Apps, then Manage Apps >>
Click the button labeled Org-wide app settings in the top right.

The MS Teams Admin will need to change the or-wide app settings using Manage Apps
This step requires the MS Teams Admin with rights to set org-wide settings
In the settings panel that slides in, set the setting Third-party apps to On (if it is already set to on, you do not need to make any changes)
You can leave the settings New third-party apps published to the store and Auto install approved apps off if they are not already enabled.

Enable third-party apps in the organization-wide settings
Whatever it is, the way you tell your story online can make all the difference.
Click Save and close the settings panel.
Next, navigate to Teams Apps, then Permission Policies >>
Select an existing permission policy to apply this to. For the rest of this guide we will be using Global (Org-wide default), but you can test it on a smaller group if you want to before pushing to the entire org.

Clear example of the MS Teams Admin setting Permission Policies and setting Global (org-wide default)
After the MS Teams Permission Policies are updated, the chat service desk app can be installed across the organization

Select the Third-party apps dropdown option and make sure to set it to Allow specific apps and block all others
If it has previously been set to the Allow all apps option, leave it set to that and you do not need to progress into the guide any more, you are done
Click the Allow apps button (or the + Add Apps button if there are already some within this option).

Teams admin allow apps to get installed across the organization
Have the Teams admin specify the app to allow is across the organization - to deploy chat FAQ and AI Powered Chat App for everyone in company
A panel will open where you can search for apps to allow. Search for Chime V5, and select it when it appears in the options.
Click Allow.

Enable Chime V5 for Org Wide Deployment
Centrally deploy enterprise chatbot for chat FAQ and Chat service desk
Verify that Chime V5 shows up under the Allowed Apps section and click the Save button to apply changes.

Push chatbot Chime V5 to everyone in organization using Microsoft Teams
Final step to make chat application available to everyone using Microsoft Teams
How to Make a Chatbot for FAQ Articles and Make Sure They Open in Teams Correctly
Open FAQ Links In Microsoft Teams
Creating Links
Use our embedded content management system (CMS) to create an FAQ chatbot and have the FAQs display in Microsoft Teams. This article will show how to quickly do this using our FAQs and a simple chatbot (chat pipeline) You can get started in one of two ways:
1. Use the Create Link button to have a link created for you.

Use FAQ system to create text that will be used in the FAQ chatbot
You can add any text that you’d like to the FAQ and also reference additional FAQs, SharePoint articles, or other content
2. Type out the Link format inline.
[Link Text](URL) — Used if you want the user to navigate to the link in the same page.
[Link Text](URL){target="_blank"} — Used if you want the user to navigate to the link in a new tab.
Replace Link Text with the text you want to display for the link, and replace URL with the actual URL you want to link to.
The target="_blank" attribute tells the browser to open the linked document in a new tab or window. So, for example, if you want to create a link to Google that opens in a new tab with the text "Google", you would write:
[Google](https://www.google.com){target="_blank"}Formatting Notes for Links Displayed in Teams
If you want links within FAQs to work well in Teams, there are a few formatting properties to consider:
If you are linking to page hosted in Chime (FAQ article, page, chat history, etc…) you just need to use [Link Text](URL) format
If you are linking to a page outside of Chime (SharePoint page, Knowledgebase article, video, etc…) you will need to use the specific [Link Text](URL){target="_blank"} format as they will either not be whitelisted to display, or the content provider will not allow the page to be displayed in Iframes which is what Teams uses to show links.
Here is some additional documentation on markdown syntax to help if you have any additional questions: Markdown Guide: Links Syntax
Example
This is what it will look like in the Teams client if you have a link to an outside source (for example, if content is still stored in SharePoint and is located outside of the embedded CMS FAQ system:

For example, reference a SharePoint or external link from the FAQ chatbot
These FAQs will show during the chat session and will be displayed within Microsoft Teams
Display a FAQ chatbot from within Microsoft Teams
You build the FAQs and let our chatbot display the FAQS when employees search for help - display the FAQs within Microsoft Teams
To fix this issue, we will want to update the links to all include the {target="_blank"} attribute to them. This is how it will look for users once that is updated:

Edit the FAQ ChatBot using markdown or html - our chatbot does the work
Build the FAQs and our chat pipeline will convert these into a great ChatBot system for FAQs - all within Microsoft Teams

Another example of how to Create Q&A chatbot for Teams
How to build a Q&A ChatBot for FAQS - no programming, using our FAQs, and display it all within Microsoft Teams
How to push the Teams application org-wide
Review prerequisites, step-by-step installation, and configuration tips
If you are in the process of onboarding, please make sure you have gone through and considered or completed these two steps:
Authorize Chime V5 Teams App in Microsoft Teams Admin Center >>
Steps to Customize (Apply Branding) Teams App in Teams Admin >>
Update the Install Welcome Message in Chime >>
Once you are ready to start deploying the Chime V5 app either for your small pilot testing or when pushing to it to your organization, this guide will help to lay out the steps to follow to get the app pushed as well as cover some of the customization options to consider before pushing to groups of users.
Teams Admin configures user group permissions
Navigate to Permission Policies in the Teams Admin Center. You will now need to configure policies to allow the Chime V5 Teams app to only to be accessible for your Org.
If you had previously set up the App permission policy to apply to a specific user group, you will need to update it to be org-wide. For a guide on how to do that, see this Guide on Approving Chime V5 app for your Org.

Microsoft Teams admin center - Permission policies
First, go to the Teams admin center to find the app you’d like to deploy
Additionally, you may want to automatically install and pin the Chime V5 app in the Teams client for users in the pilot. To do this you would want to update the app setup policies in the Setup Policies tab of Teams Admin Center.
Navigate to Setup Policies.

Teams Admin Center Setup policies navigation
Select the Global (Org-wide default) policy
Click on the Global (Org-wide default) setting

Org-wide installed app
You may pin the org-wide installed app into the left side navigation of Microsoft Teams
Under the Installed apps section, click on + Add apps and search for Chime V5 and select it.
Click Add. Verify that the Chime V5 app appears in the list of installed apps.
Click Save.
If you want the Chime V5 app to appear on the left-side menu for users, we will also want to pin the app.
Under the Pinned apps section, click on + Add apps and search for Chime V5 and select it.
Click Add. Verify that the Chime V5 app appears in the list of pinned apps.
Rearrange the order of the pinned apps to suit where you want the app to show up.
Click Save.
Additional note on updating Teams apps:
If you have made any branding/styling changes to the Chime V5 Teams app during this process some users may see the old version of the app name or an old/broken app icon in their Teams client.
This can typically be fixed by having the user logging out of Teams and logging back in. If that doesn’t work, the user can go in and manually clear the cache in teams following this Microsoft guide: Clear the Teams client cache >>
Here is some additional documentation from Microsoft on managing permission policies and setup policies:
Use app permission policies to control user access to apps
Use app setup policies to pin and auto install apps for users
Enable Azure login for the web app with Graph API permissions
Approve the use of Graph API Permissions for Azure AD/Entra Login
When initially onboarding the service desk you will need an Azure AD/Entra Admin to approve the use of some Graph API permissions for the service desk web application to enable Azure AD/Entra login. In this article we will cover the list of API permissions you will need and details of what each of them do and are used for. Below are the specific Graph API permissions the app will request when you are prompted to approve Azure AD/Entra login:
email - Delegated

The email permission allows the service desk app to read your users’ primary email address
openid - Delegated

The openid permission allows users to sign in to the service desk app with their work accounts
It also allows the app to see basic user profile information. Microsoft Documentation >>
profile - Delegated

The profile permission allows the service desk app to see your users' basic profile
The profile includes name, picture, user name, and email address. Microsoft Documentation >>
User.Read - Delegated

The User.Read permission allows users to sign-in to the service desk app, and allows the app to read the profile of signed-in users
It also allows the app to read basic company information of signed-in users. Microsoft Documentation >>
As the Azure administrator, we may request the Tenant Id of your org before this next step so that we are able to associate the Chime V5 instance stood up by Instant Tech team. Once the instance is ready to be linked to your AD/Entra login, the Instant Tech team will send across a link for you to approve the requested permissions.

Accept the permissions request to link your AD/Entra login for your service desk
In this permissions request it will detail the permissions we are using and allow you to consent on behalf or your organization.
Once you have accepted the permissions, the log in option for Chime V5 will associate users logging in with their Office 365 accounts and will require users to login with their org accounts.
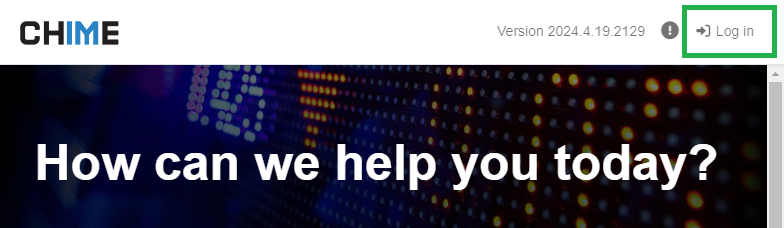
Select the log in button on your service desk home screen
You will be prompted with the Microsoft O365 login to authenticate into your service desk

Log into your help desk tenant using Microsoft O365 authentication
Using O365 authentication allows for a much more secure service desk ensuring data privacy
Set Up Service Desk Chat With Chat Routing Notifications For Agents
Route Notifications Directly To Your Teams Channel
Our platform is designed to help resolve employee problems - typically using chat, chat based FAQs, and allow service desk agents to use chat to resolve employee questions. This web hook notification will use Microsoft Teams to send agents notifications of inbound chat sessions.
When employing Chime V5 pipeline workflows, agents can now receive notifications directly on their dashboard when new chat sessions arrive. By integrating Webhooks with Teams, these V5 workflows can be linked to a designated Teams channel, providing improved accessibility through broadcast notifications.
Add Incoming Webhook to Your Teams Channel
Navigate to Your Teams Channel
Begin by navigating to the Teams channel where you want to receive broadcast notifications.
Select More Options Menu
In the chosen channel, click on the more options menu (three dots) located at the top-right corner.
Navigate to Connectors
Depending on your Teams version there will be two different ways to get to the Connectors menu.
(Old Teams) From the dropdown menu, select Connectors.
(New Teams) From the dropdown menu, select Manage Channel, then under the Connectors section, click Edit.

Configure teams channel notifications - navigate to Teams channel connectors
From the dropdown menu, select Connectors
Add Incoming Webhook

Add Incoming Webhook from the list of connectors
Click on the Add button next to the Incoming Webhook option.

Confirm adding Incoming Webhook to your Teams channel
On the Incoming Webhook page, click Add again to configure the webhook.
Configure Incoming Webhook
Navigate Back to Connectors
Return to the Connectors menu.
Configure Incoming Webhook
Click on the Configure button next to the Incoming Webhook option.

Configure Incoming Webhook from the list of connectors
Click on the Configure button next to the Incoming Webhook option.
Fill Out Webhook Name
Provide a meaningful name for the Incoming Webhook to easily identify its purpose.
Optionally, you can also click the Upload Image button to additionally change the branding image used when it sends messages.
Create Webhook

Create web hook for chatbot - name and create your Incoming Webhook URL
Click on the Create button to generate the Webhook URL.
Copy Webhook URL
Once the URL is generated, click on the Copy button or manually highlight and copy the link.

Copy the newly generated Webhook URL - to notify using Microsoft Teams
Once the URL is generated, click on the Copy button or manually highlight and copy the link.
Configure In Chime V5 Tenant
Navigate to Chime V5 Tenant
Open your Chime V5 tenant and access the chat pipeline.
Edit Chat Pipeline
Select the Edit option in the chat pipeline.
Connect to Agent Pipeline Item
Open the details for the Connect to Agent pipeline item.
Enable Webhook
Toggle the Webhook Enabled option to activate the webhook functionality.
Paste Webhook URL
In the Webhook URL field, paste the previously copied URL from Teams.

Paste the Incoming Webhook URL into the ‘Connect to Agent’ chat flow stage
In the Webhook URL field, paste the previously copied URL from Teams.
Agent Experience
When a Guest/End User works through a chat session to start routing to agent, a broadcast notification is sent to the connected Teams channel and all Agents will have the ability to accept the chat session.

agents can accept chats using Microsoft Teams - View the Webhook Teams notifications for agents
Setup chatbot to to send a broadcast notification to the connected Teams channel
Setting Up Real-time Agent Notifications with Teams
Send Notifications Directly To Your Teams App
This feature allows agents to receive instant notifications in their Teams client when a chat is routed to them, directly from the bot. In this guide, we'll walk you through the setup process to ensure a seamless integration into your workflow.
Prerequisites
Before diving into the setup, ensure that you have the latest version of Chime V5 installed. If not, make sure to update your Chime application to access the latest features and improvements.
Integration with Teams
Chime V5's real-time agent notifications are tied into the same Orchard Feature as the Teams channel webhook notification feature. This ensures a consistent and streamlined experience for administrators and agents alike.

Features Page
Find ChimeV5.Teams.AgentNotifications feature from the admin dashboard
Agents can now receive notifications in their Teams client when a chat is routed to them, in addition to the existing webhook method for routing into a Teams Channel.

Microsoft Teams Notification Cards
Receive incoming support chat notifications within Microsoft Teams
User Settings Management
To enable these notifications, user settings must be configured to store the Teams ID and conversation ID reference for each agent. This information is added to the Orchard User record, similar to the setup for the Agent Profile.
User Settings in the Admin Area
In the Admin section, navigate to the user record, where a new "Teams Notifications" tab has been added. Here, administrators can manage Teams addresses for each user.

configure notifications using Microsoft teams - Edit User Page
Enable or disable the incoming ms teams chat notifications within your user settings
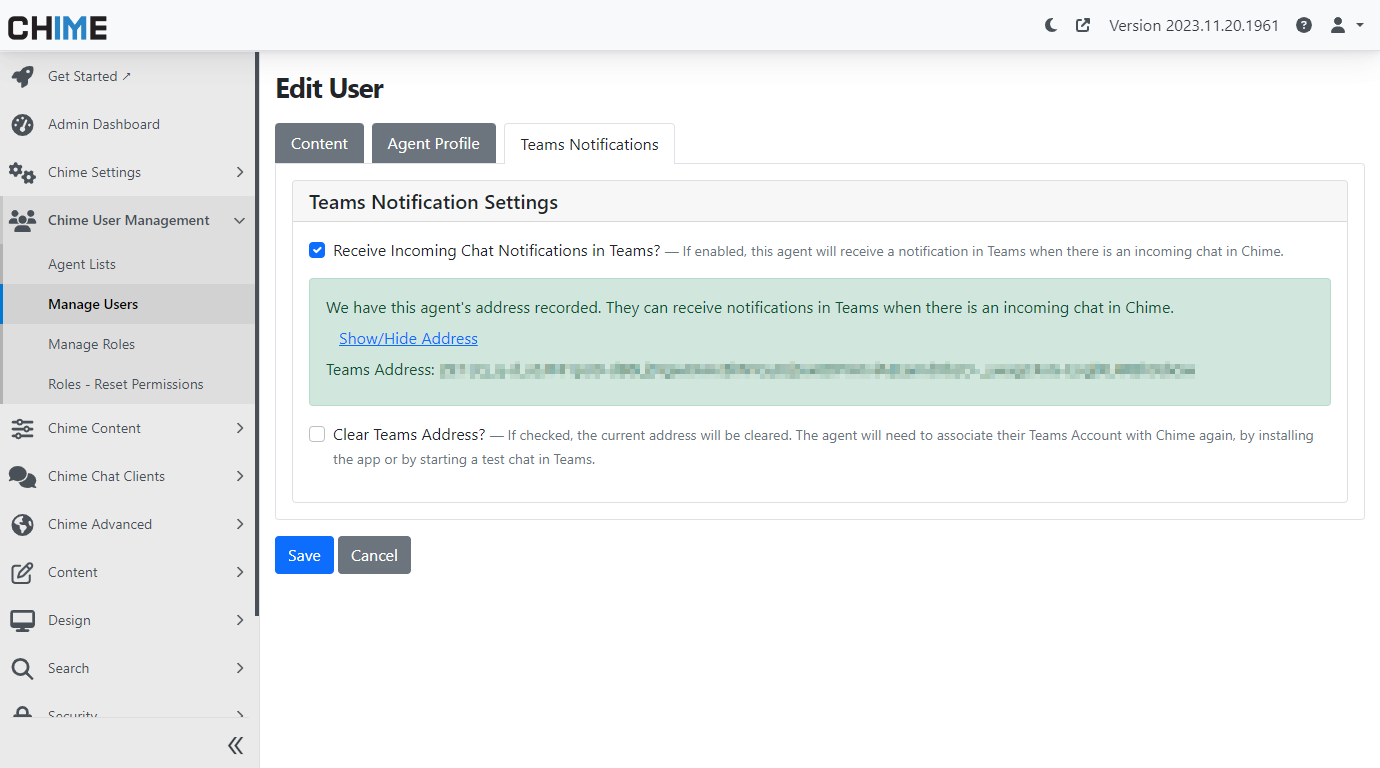
Edit User
See the Teams Address from your Teams Notifications Tab in User Settings
User Settings in Manager Area
For the Manager dashboard, a new section in the user page displays Teams notification settings. Managers can easily view and update this information when managing agents.

Edit User in Manager Dashboard
Teams notification settings is also available from the manager dashboard “Manage People“ page
User Settings for Agents
Agents can access their Teams notification settings on their Agent Dashboard Settings page. Additionally, buttons are available to Install Chime in Teams and Start Chat in Teams, facilitating the capture of Teams address information.

Agent Settings
Teams notifications or Teams integration also available from the Agent Settings
Tenant-level Configuration
At the tenant level, administrators can configure additional settings to customize the Teams integration experience.
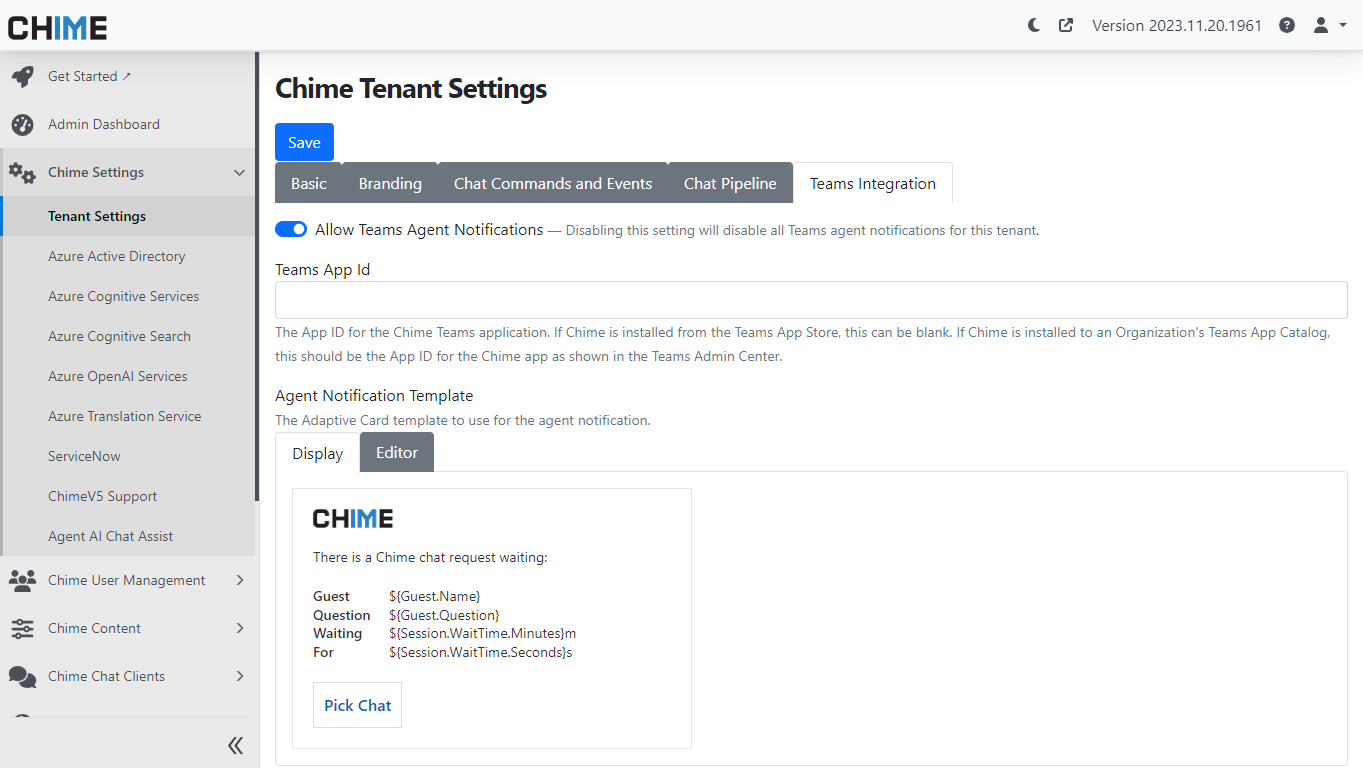
Tenant Settings - Teams Integration
Administrator can enable/disable Teams Agent Notifications from Tenant Settings and update the card sent to agents
Tenant-wide enable/disable toggle: Easily enable or disable the feature for the entire tenant.
Override for the Teams App Id: Specify the App Id based on the installation method, ensuring seamless integration.
Adaptive Card Template: Customize the notification's appearance using an Adaptive Card Template.
Sending Agent Notifications
With the setup complete, agents, having their Teams Addresses captured, will receive notifications in their Teams client when a chat is routed to them.
Agent Notification demo within Microsoft Teams
See how agent can receive and accept incoming support chat from Microsoft Teams
The implementation of this feature is seamlessly integrated into the Orchard Workflow events, requiring no changes to the chat pipeline. While it's not tied to Teams presence, agents need to have a Chime browser window open and be available to receive notifications.
All Metadata Values Available in Chime
View The Latest Set Of Metadata Variables
This will cover all available metadata variables that are usable for reporting, adaptive cards, standard replies, and outages.
Guest Variables
| Variable Name | Description | Example Values |
|---|---|---|
| Guest.AadObjectId | Guest user's Active Directory/Entra User Object ID | e6a2b68c-2cdf-4b83-abea-f29f710aea0c |
| Guest.ChannelId | Channel Guest is coming in on (directline or msteams) | msteams |
| Guest.Email | Email of the Guest | bsmith@example.com |
| Guest.GivenName | First/Given name of the Guest | Bob |
| Guest.Id | Chime ID of the Guest | dl_bsmith@00000000-0000-0000-0000-000000000000 |
| Guest.IsNew | True or False for if this is the first time the Guest is using Chime | true |
| Guest.Locale | Location and Language settings of the Guest | en-US |
| Guest.Name | Full name of the Guest | Bob Smith |
| Guest.Question | Question of the Guest | Hi I need to reset my email password |
| Guest.Surname | Last/Surname of the Guest | Smith |
| Guest.TenantId | Tenant ID for the organization of the Guest | |
| Guest.TenantName | Tenant name that the Guest is coming into | Example Inc |
| Guest.UserPrincipleName | Active Directory/Entra UPN of the Guest (username and domain in an email address format) | bsmith@example.com |
| Guest.Country | Country of the Guest | US |
| Guest.Timezone | Timezone of the Guest | America/New_York |
| Guest.Platform | Operating system/platform the Guest is using | Windows |
Session Variables
| Variable Name | Description | Example Values |
|---|---|---|
| Session.EndedUtc | Date and time that the chat session ended in UTC timezone | 01/04/2024 17:42:47 |
| Session.ChatID | Directline Chat ID for the current session | 8bVNRWxnMRvFBiUj7VhFAB-us |
| Session.State | State name that the chat session is in | Completed |
| Session.Status.IsResolved | Boolean for if the chat session was resolved or not | True |
| Session.Status.ResolutionNotes | Can be used to provide notes about the chat resolution by the pipeline or by Agents after the chat ended | Guest was able to use ChatGPT assist to answer their questions and resolve this chat |
| Session.Status.ResolvedByAgentId | Agent Id for agent that resolved the chat session | 47ab169g1vp5hzm09914stk55g |
| Session.Status.ResolvedByAgentName | Lists out the name/names of Agents that were in the chat when it was resolved | John Doe, Jane Doe |
| Session.Status.ResolvedByType | Describes which Pipeline Item the chat was at when it was resolved | Agent, ChatGPT, AI Assist |
| Session.WasConnectedWithAgent | Boolean for if the Guest was connected to an Agent in the chat session | true |
| Session.deflected | Boolean for if the chat session was deflected | True |
| Session.deflectedBy | Describes which Pipeline Item the chat was at when it deflected | FAQ Lookup |
| Session.SessionId | Chime's internal Session ID for the chat session | 3b810491-a2d3-4a2a-95e9-fc75e7107819 |
| Session.StartedUtc | Date and time that the chat session started in UTC timezone | 05/27/2022 133429 |
| Session.ReferrerUrl | If the chat was started from webclient, this is the URL of the page it came from | https://example.com/ |
| Session.EntryPoint | Method the Guest used to start the chat session, Teams or Webclient | Webclient |
| Session.CurrentPipelineStage.Name | Name of the Pipeline Item that the chat session is on currently | connectToAgent |
| Session.CurrentPipelineStage.Type | Type of Pipeline Item that the chat session is on | ConnectedToAgentState |
| Session.PipelinePath | List of JSON objects that cover each Pipeline Item the chat has routed through | [ { "ToState": "welcomeMessage", "ToStateType": "SendCardState", "FromState": "StartChat", "Timestamp": "2024-01-04T18:18:11.3745466+00:00" }, { "ToState": "connectToAgent", "ToStateType": "ConnectedToAgentState", "FromState": "welcomeMessage", "FromStateType": "SendCardState", "Timestamp": "2024-01-04T18:19:11.3745508+00:00" }] |
| Session.SkillTags | Comma seperated list of any Skill Tags that are linked to the chat session | Office365, Email |
| Session.SkillTagList | List format of any Skill Tags that are linked to the chat session | [ "Office365", "Email" ] |
| Session.PickChatUrl | URL the Agent can use to pick/accept the chat session | https://app.imchime.com/Example/Session/00000000-0000-0000-0000-000000000000?connectToSession=true |
| Session.IsConnectedToAgent | Dynamic boolean for if the Guest is connected with one or more Agents | true |
| Session.IsWaiting | Dynamic boolean for if the Guest is currently in the "Conect to Agent" Pipeline Item and waiting for an Agent to accept their chat session | false |
| Session.StartedWaitingAt | Date and time the chat session went into the Waiting state (Guest is routing to an Agent) | 2024-01-04T18:20:05.1769764+0000 |
| Session.ConnectedToAgentAt | Date and time the chat session went into the Connected state (Agent picked up Guest's chat) | 2024-01-04T18:20:11.3769773+0000 |
| Session.WaitTime | The current ammount of time the chat session has been in the Waiting state (JSON object) | { "String": "0:00:06.2", "Seconds": 6, "Minutes": 0, "TotalSeconds": 6.2, "TotalMinutes": 0.10333333333333333 } |
| Session.WaitTime.String | Wait time as a string | 0:00:06.2 |
| Session.WaitTime.Seconds | Number of seconds the chat has been waiting (not total seconds) | 6 |
| Session.WaitTime.Minutes | Number of minutes the chat has been waiting | 0 |
| Session.WaitTime.TotalSeconds | Total number(decimal) of seconds the chat session has been waiting | 6.2 |
| Session.WaitTime.TotalMinutes | Total number(decimal) of minutes the chat session has been waiting | 0.10333333333333333 |
| Session.ConnectedTime | The current ammount of time the chat session has been connected to an Agent (JSON object) | { "String": "0:03:42", "Seconds": 42, "Minutes": 3, "TotalSeconds": 222, "TotalMinutes": 3.7 } |
| Session.ConnectedTime.String | Connected time as a string | 0:03:42 |
| Session.ConnectedTime.Seconds | Number of seconds the chat has been connected (not total seconds) | 42 |
| Session.ConnectedTime.Minutes | Number of minuntes the chat has been connected | 3 |
| Session.ConnectedTime.TotalSeconds | Total number(decimal) of seconds the chat session has been connected | 222 |
| Session.ConnectedTime.TotalMinutes | Total number(decimal) of minutes the chat session has been connected | 3.7 |
| Session.AverageWaitTime | The average wait time of all sessions over the last 24 hours [Total wait time / number of sessions] (JSON object) | { "String": "0:01:11", "Seconds": 11, "Minutes": 1, "TotalSeconds": 71, "TotalMinutes": 1.1833333333333333 } |
| Session.AverageWaitTime.String | Average wait time as a string | 0:01:11 |
| Session.AverageWaitTime.Seconds | Number of seconds for the chats average wait time (not total seconds) | 11 |
| Session.AverageWaitTime.Minutes | Number of minutes for the chats average wait time | 1 |
| Session.AverageWaitTime.TotalSeconds | Total number(decimal) of seconds for the chats average wait time | 71 |
| Session.AverageWaitTime.TotalMinutes | Total number(decimal) of minutes for the chats average wait time | 1.1833333333333333 |
| Session.AverageWaitTimeLastHour | The average wait time of all sessions over the last hour [Total wait time / number of sessions] (JSON object) | { "String": "0:01:14", "Seconds": 14, "Minutes": 1, "TotalSeconds": 74, "TotalMinutes": 1.2333333333333334 } |
| Session.AverageWaitTimeLastHour.String | Average wait time from the last hour as a string | 0:01:14 |
| Session.AverageWaitTimeLastHour.Seconds | Number of seconds for the chats average wait time from the last hour (not total seconds) | 14 |
| Session.AverageWaitTimeLastHour.Minutes | Number of minutes for the chats average wait time from the last hour | 1 |
| Session.AverageWaitTimeLastHour.TotalSeconds | Total number(decimal) of seconds for the chats average wait time from the last hour | 74 |
| Session.AverageWaitTimeLastHour.TotalMinutes | Total number(decimal) of minutes for the chats average wait time from the last hour | 1.2333333333333334 |
| Session.ExpectedWaitTime | How much longer the Guest is expected to wait [AverageWaitTime - WaitTime] (JSON object) | { "String": "0:01:04.8", "Seconds": 4, "Minutes": 1, "TotalSeconds": 64.8, "TotalMinutes": 1.08 } |
| Session.ExpectedWaitTime.String | Expected wait time as a string | 0:01:04.8 |
| Session.ExpectedWaitTime.Seconds | Number of seconds the chat is expected to wait (not total seconds) | 4 |
| Session.ExpectedWaitTime.Minutes | Number of minutes the chat is expected to wait | 1 |
| Session.ExpectedWaitTime.TotalSeconds | Total number(decimal) of seconds the chat is expected to wait | 64.8 |
| Session.ExpectedWaitTime.TotalMinutes | Total number(decimal) of minuntes the chat is expected to wait | 1.08 |
| Session.ExpectedWaitTimeLastHour | How much longer the Guest is expected to wait [AverageWaitTimeLastHour - WaitTime] (JSON object) | { "String": "0:01:07.8", "Seconds": 7, "Minutes": 1, "TotalSeconds": 67.8, "TotalMinutes": 1.13 } |
| Session.ExpectedWaitTimeLastHour.String | Expected wait time from the last hour as a string | 0:01:07.8 |
| Session.ExpectedWaitTimeLastHour.Seconds | Number of seconds the chat is expected to wait from the last hour (not total seconds) | 7 |
| Session.ExpectedWaitTimeLastHour.Minutes | Number of minutes the chat is expected to wait from the last hour | 1 |
| Session.ExpectedWaitTimeLastHour.TotalSeconds | Total number(decimal) of seconds the chat is expected to wait from the last hour | 67.8 |
| Session.ExpectedWaitTimeLastHour.TotalMinutes | Total number(decimal) of minuntes the chat is expected to wait from the last hour | 1.13 |
| Session.WaitMessageCount | Number of wait messages that have been sent to the Guest while looking for an Agent | 2 |
| Session.ConnectedAgents | List of JSON objects for the Agents that connected to the chat session | [ { "Name": "Jim Jones", "FirstName": "Jim", "LastName": "Jones", "Email": "jjones@example.com", "Connected": "05/27/2022 13:34:56", "ID": "47ab169g1vp5hzm09914stk55g", "ProfileImageUrl": "https://app.imchime.com/Example/media/media/_branding/default_profile.jpg"},{ "Name": "Carol Johnson", "FirstName": "Carol", "LastName": "Johnson", "Email": "cjohnson@example.com", "Connected": "05/27/2022 13:37:56", "ID": "47ab169g1vp5hzm09914stk44g", "ProfileImageUrl": "https://app.imchime.com/Example/media/media/_branding/default_profile.jpg"} ] |
| Session.NumberOfConnectedAgents | The number of Agents currently connected to the chat session | 2 |
| Session.AvailableAgentCount | The number of Agents who are currently online and able to accept the chat session | 3 |
| Session.WaitingGuestCount | The number of Guests who are currently waiting for an Agent to accept their chat session | 4 |
| Session.PositionInQueue | The position in queue that the current chat session is in (how many Guests will get connected to an Agent before this Guests chat session) | 1 |
Agent Variables
| Variable Name | Description | Example Values |
|---|---|---|
| Agent.Name | Full name of the current Agent | Jim Jones |
| Agent.FirstName | First name/Given name of the current Agent | Jim |
| Agent.LastName | Last name/Surname of the current Agent | Jones |
| Agent.Email | Email of the current Agent | jjones@example.com |
| Agent.ProfileImageUrl | Media library URL location of the Agent's profile image | /media/_branding/default_profile.jpg |
| Agent.Connected | Date and time that the Agent connected to the Guest's chat session | 05/27/2022 13:34:56 |
| Agent.ID | Agent ID for the current Agent | 47ab169g1vp5hzm09914stk55g |
Sender Variables
| Variable Name | Description | Example Values |
|---|---|---|
| Sender.Name | Full name of the current Agent | Jim Jones |
| Sender.FirstName | First name/Given name of the current message sender | Jim |
| Sender.LastName | Last name/Surname of the current message sender | Jones |
| Sender.Email | email of the current message sender | jjones@example.com |
| Sender.ProfileImageUrl | Media library URL location of the message sender's profile image | /media/_branding/default_profile.jpg |
| Sender.Locale | Locale of the current message sender | en-US |
Routing Variables
| Variable Name | Description | Example Values |
|---|---|---|
| Routing.AgentList.Name | Name of the agent list | Service Desk |
| Routing.AgentList.Id | ContentItemId of the agent list | 4m49qcqycbygv3m88g80r7aw51 |
| Routing.AgentList.Type | Type of the agent list => [All, Tagged, Selected] | Selected |
| Routing.Mode | Which routing mode is configured for the agent list | RoundRobin |
Chatbot Variables
| Variable Name | Description | Example Values |
|---|---|---|
| Chatbot.ConnectedAt | Date and time when the AI chatbot connected with the guest | 2024-01-17T09:37:11.3745267Z |
| Chatbot.DisconnectedAt | Date and time when the AI chatbot disconnected from the guest | 2024-01-17T16:41:53.3578965Z |
| Chatbot.Escalated | True or false if the chat was escalated to a live agent | false |
| Chatbot.Deflected | True of false if the chat was deflected by the chatbot | true |
AI Summary Metrics
| Variable Name | Description | Example Values |
|---|---|---|
| AI.Summary.Title | AI generated title summarizing the chat session | Installation and configuration of AI-Enabled Help Desk Instant Chiume V5 |
| AI.Summary.Issue | AI generated summary of the initial issue the guest comes in with | The customer wants to know how to install the AI-enabled help desk, Chime V5. |
| AI.Summary.Resolution | AI generated summary of how the chat was resolved between the Agent and Guest | The agent informed the customer that they can install the application from the Microsoft Teams App Store and configure the tenant. No custom Azure resources are required as all necessary resources are included in the deployment. The customer successfully installed the application. |
| AI.Summary.Narrative | AI generated summary of the main important points covered in the chat session | The transcript is about how to install the AI-enabled help desk, Chime V5, from the Microsoft Teams App Store. It explains that the tenant can be configured with a unique database instance, tenant URL, and tenant administrator, and that no custom Azure resources are required. The Web Visitor successfully installed the software. |
Outages
| Variable Name | Description | Example Values |
|---|---|---|
| Session.OutageId | Content ID of the Outage the guest selected | 43mbkc86gc1vjtvt6427cd0jw9 |
| Session.OutageTitle | Title of the Outage the guest selected | Email services down from 5:30 to 7:15 for maintenance |
| Session.SubscribeToOutage | Did the guest subscribe to receive update notifications about the outage? | true |
Ticketing
| Variable Name | Description | Example Values |
|---|---|---|
| Ticket.Id (GUID) | ID of the ticket created | efed3b82-6d83-46fd-b80e-1da34d9a90ff |
| Ticket.Number | Ticket number created in the ticketing system | 0938479538 |
| Ticket.CreatedByChime | Was the ticket created by Chime? (true or false) | true |
| Ticket.URL | URL of the ticket | https://ticketingsystem.com/tickets/0938479538 |
| Ticket.ITSM | Name of the ticketing platform the ticket is on | (JIRA, SERVICE-NOW, SOLARWINDS, JIRA or CHERWELL) |
System Variables
| Variable Name | Description | Example Values |
|---|---|---|
| System.CurrentTimeUTC | Current date and time in UTC time zone | 2024-01-04T18:20:11.3745267Z |
| System.CurrentTime | Current time in local time zone | 14:20:11+0000 |
| System.CurrentDate | Current date in your local time zone | 2024-01-04 |
| System.CurrentDateTime | Current date and time in your local time zone | DATE(2024-01-04) TIME(14:20:11+0000) |
| System.BaseUrl | Base URl of your Chime V5 tenant | https://app.imchime.com/Example |
| System.Tenant | Name of your Chime V5 tenant | Example |
| System.PipelineName | Name of the Pipeline you are routing in | Self Service Pipeline |
| System.MediaUrl | URL of your tenant's Media Library | https://app.imchime.com/Example/media/ |