Human Handoff - Agent in AI Chat
Agents in Chat AI desk - Human Escalation and Routing
Training Resources
Essential Tools for Agents
Agent Availability
Stay connected and visible.
Agents can set their status, view incoming requests, and monitor active chats in real time — with the option to link availability directly to Microsoft Teams presence.
AI Assist
Smarter responses, faster support.
Agents receive AI-powered suggestions, quick replies, and context-aware insights directly in the chat UI.
Agent Escalation
Route complex issues with ease.
Easily escalate sessions to Tier 2 or specialized agents, ensuring every conversation gets the right level of support.
AI Translation
Break down language barriers instantly.
Enable seamless multilingual conversations with real-time translation built into the chat experience.
Core Agent Skills
The basics every agent should know:
Staying Available – Manage your status so you’re ready when new chats arrive.
Accepting Chats – Use the Agent Dashboard to connect with incoming requests.
Chatting with Guests – Support users through the chat window, with options like real-time translation for multiple languages.
For more details, visit our FAQ guide to getting started as an agent
Quick Links - Jump to a Feature:
Navigation, Availability, Agent Dashboard, Agent Browser Notifications, Reports, Settings and User Profile, Accepting Chat Sessions, Chat Conversation, Chat History, File Upload, Standard Replies, Ticketing, AI Translation, FAQs, Escalate Chats, Mark Sessions As Resolved, Agent AI Assist & Support Tools, Related Content
Navigation
In the top right of the web app there is a button with your username on it. This is called the Navigation menu and allows you to navigate to the Agent Dashboard, Settings Profile, and Change Password areas. This is also where you will be able to log out.
Availability - Web Based
Next to the Navigation menu in the top right of your window, there is a dropdown that allows you to update your availability. As an Agent, you will want this to be set to Available whenever you are at your computer and able to accept chat sessions.
Chat availability also shares your availability status with both other agents and your managers.
Availability - Teams Presence
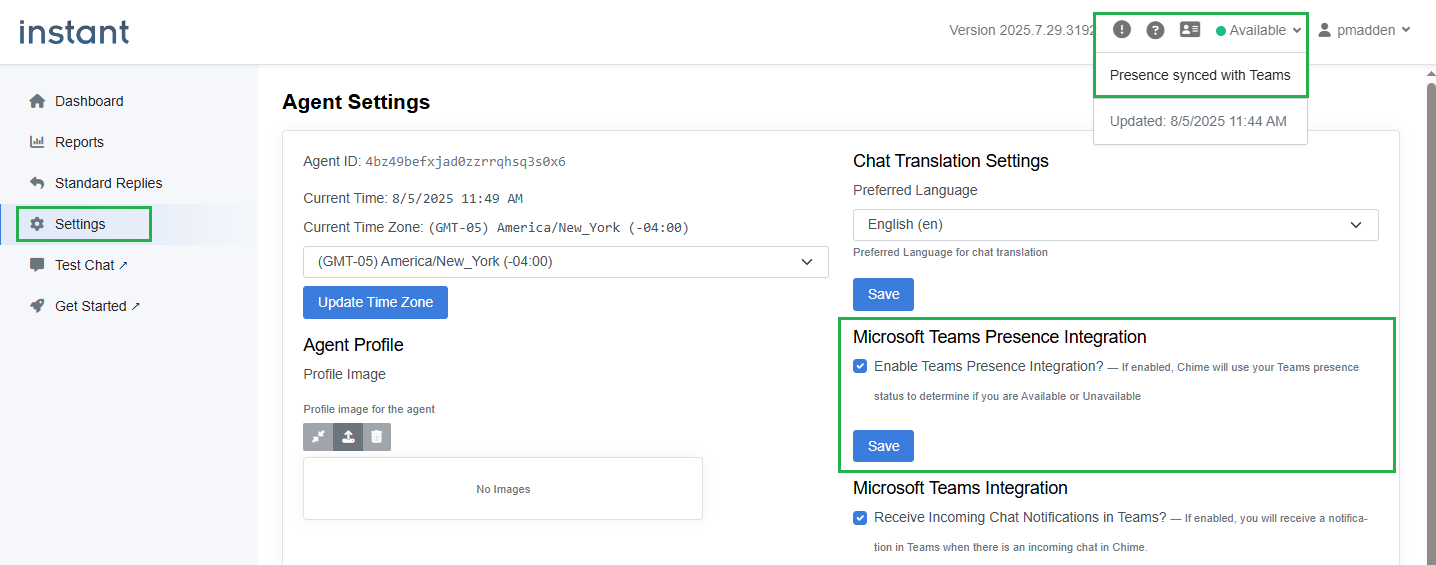
Your team may be using your status in Teams to determine if you are able to be prompted to accept chats. Check with your manager to see if this is how you will be keeping track of your availability. If you want to set up the option in your Agent profile:
Navigate to the Agent Dashboard, then Settings
Check the box that says “Enable Teams Presence Integration?”
Save the settings
Once you have done that, the presence indicator in the top-right will change to show your presence is synced with Teams. Note: it may take up to 1 minute for the presence to update after you have changed it in Teams.
Agent Dashboard
The Agent Dashboard provides information on ongoing and current calls. From the left side navigation menu, you can view reports and update settings. The Agent Dashboard can always be reached from the left side navigation menu.
Agent Browser Notifications
The Agent Dashboard supports integrated browser notifications. Browser notifications when selected will open to the Agent Dashboard tab or window so that an agent can accept the incoming chat. This option can be toggled on or off at any time within the browser site settings.
Reports
On the left side menu, you are able to navigate to Reports. Reports allow you to see data from your previous chats, and export results from the reports you run.
Settings and User Profile
From the Settings option on the left side menu, you are able to see all of the user settings for your account. From here you can choose a profile image, update your name, add Tags based on your skills, set your preferred language, enable notifications in Teams, and choose chat settings to enable the Waiting Chat Prompt Ringtone, as well as Auto Leave Chat After Closing Agent Web Client.
Accepting Chat Sessions
The Agent Dashboard will display incoming guest help requests. The hat service will determine what Agents are available and ready to help. If you are available, you will receive requests to accept chat sessions that are coming in. These can be found in the Incoming Chats area of the Agent Dashboard.
Click the Accept Chat button to assist the Guest. When you do this, another window will open starting the chat conversation. The chat conversation window is covered below in a separate section.
If you have the Enable Waiting Chat Prompt Ringtone setting enabled, a chat prompt ringtone will be sent to let you know a chat is incoming.
Chat Conversation
Once you have accepted a chat conversation, you can see the guest’s initial question, as well as other useful chat information. Use the left side to chat with the Guest.
Chat History
If you click on the History tab you are able to see the guest’s previous chat history. This data can be used if they are following up on a previous chat, or if the issue they are experiencing is reoccurring.
File Upload
Using the attachments button on the bottom left of the Agent chat window, you are able to upload a file over to the Guest. Additionally, if you click on the Files tab, you are able to view and download any files sent during the chat.
Standard Replies
From the Standard Replies tab, you are able to see a list of common replies provided to you. These can be sent to the guest at the click of a single button.
Ticketing
From the ticketing tab, agent are able to view past and ongoing tickets for incoming users. This allows them to give informed responses based on background information speeding up incident resolution times.
AI Agent Translation
Using the translation tab, agents are able to utilize Azure AI to translate chats in real time. Selections of language options can be set at the tenant level and default agent language can be set for each user.
FAQs
Using the FAQs tab, agents are able to view articles that have been displayed to the guest user based on their search. Agents are able to see which articles have been viewed by the guest via the eye icon.
Escalate Chats To Teams Meeting
Agents are able to escalate chat sessions to a Teams meeting using the ‘Meet on Teams’ button. A meeting link is generated upon selection with a customizable display text for the hyperlink that is sent. Upon selecting the link the guest user will be routed directly to Teams allowing for streamlined communication.
Escalate Chats To Pipeline
Agents are able to escalate chat sessions to other pipeline stages or agent lists using the ‘Route to Agent with Escalation’ pipeline stage. After configuring escalation options the agent can select the escalate button or type /escalate and then select where to route the incoming user.
Mark Sessions As Resolved
Agents are able to mark chat sessions with ‘Resolved’ or ‘Unresolved’ status as well as attach notes about the session. Upon marking a session as resolved the agent that resolved the session is displayed and other resolution metadata is populated.
Agent AI Chat Assist & Support Tools
From the AI Assist tab, It enables agents to generate responses using a custom Chat GPT bot, referencing FAQs for efficient support. Settings such as response length and ‘Temperature’ or creativity are available within Admin settings so users can create a customized AI experience. Additional AI support tools include AI Translation and AI Summarization.


