
How to Create an HTML Email Feedback

Screenshot: HTML feedback email in Outlook
There are 3 components when adding an HTML email feedback. First is the HTML email itself; second is the API to submit the feedback to; and third is the HTML page that you want the users to get redirected to after submitting the feedback from the email.
Step 1 - Add email action to your chat workflow
Open your chat workflow settings, and add an action to send an email. Typically this action is located at the end of the chat workflow.
Screenshot: Adding email action to the support chat workflow
Step 2 - Add the HTML template
Copy paste the following HTML template into the chat workflow email settings. Make sure to test on Outlook and that the HTML works there.

Screenshot: Chat workflow email settings
Step 3 - Create a web page to redirect user after submitting feedback from email
There are buttons in the feedback email to rate the experience from 1 to 5. Each button is a clickable link. When a user clicks on that link, it should open a web page and the feedback will be submitted from that web page.

Screenshot: Web page to submit the feedback
And here is an example code of that feedback page users redirect to.
<div class="container">
        <div class="row justify-content-center">
            <div class="col-sm-12 col-lg-5">
                <div class="card shadow-none my-5">
                    <div class="card-body p-4">
                        <div id="feedbackContent">
                          {% form asp_action:"PostFeedback", asp_controller: "Feedback", asp_area: "ChimeV5.GuestFeedback",  method:"post" %}
                            <h4 class="text-center mb-2">Thank you for the feedback!</h4>

                            <div class="text-center star-rating mb-4">
                                <i class="fas fa-star" onclick="updateStars(1)"></i>
                                <i class="fas fa-star" onclick="updateStars(2)"></i>
                                <i class="fas fa-star" onclick="updateStars(3)"></i>
                                <i class="fas fa-star" onclick="updateStars(4)"></i>
                                <i class="far fa-star" onclick="updateStars(5)"></i>
                            </div>

                            <div class="mb-1 text-center">
                                <label for="feedback" class="form-label">Would you mind sharing more details about your experience?</label>
                                <textarea class="form-control" id="feedback" rows="4" placeholder="Tell us more about your experience..."></textarea>
                            </div>

                            <button class="btn btn-primary w-100" onclick="submitFeedback(event)">Submit Details</button>
                          {% endform %}
                        </div>

                        <div id="thankYouMessage" class="text-center py-4" style="display: none;">
                            <h4 class="text-success mb-3">Thank you for your feedback!</h4>
                            <p class="text-muted">Your response has been recorded.</p>
                        </div>
						<div id="errorMessage" class="text-center py-4" style="display: none;">
                            <h4 class="text-danger mb-3">Error saving feedback!</h4>
                            <p class="text-muted">Your response has not been recorded.</p>
                        </div>
                    </div>
                </div>
            </div>
        </div>
    </div>

    <script>
      	let sessionId = "";
        document.addEventListener('DOMContentLoaded', function() {
            const urlParams = new URLSearchParams(window.location.search);
            const rating = urlParams.get('rating') || 4;
            //document.getElementById('ratingValue').textContent = rating;
            updateStars(rating);
      		sessionId = urlParams.get("SessionId");
      		if (!sessionId){
				sessionId = urlParams.get("sessionId");
      		}
      		console.log("SessionId is ", sessionId);
            for (const [key, value] of urlParams.entries()) {
              console.log(`${key}: ${value}`);
            }
        });

        function updateStars(rating) {
            const stars = document.querySelectorAll('.star-rating i');
            stars.forEach((star, index) => {
                star.className = index < rating ? 'fas fa-star' : 'far fa-star';
            });
        }

        function submitFeedback(e) {
            e.preventDefault();
            let postUrl = "/feedback/PostFeedback";
            postUrl = $("#feedbackContent form").attr("action");
            let numStars = 0;
            const stars = document.querySelectorAll('.star-rating i');
            stars.forEach((star, index) => {
              if (star.className.indexOf('fas fa-star')>=0){
				numStars++;
			  }
            });
      		const comment = document.getElementById("feedback").value;
            const antiForgeryToken = $("input[name='__RequestVerificationToken']").val();
      		const data = {
      			__RequestVerificationToken: antiForgeryToken,
      			SessionId : sessionId,
				Feedback : [
      				{Key:"Guest.SessionRating", Value: numStars},
      				{Key:"Guest.SessionComment", Value: comment}
      			]
      		};
      		$.post({
      			url: postUrl,
      			data: data
      		}).done(function(response){
            	document.getElementById('feedbackContent').style.display = 'none';
				document.getElementById('errorMessage').style.display = 'none';
            	document.getElementById('thankYouMessage').style.display = 'block';
      		}).fail(function() {
                console.log("Error submitting chat session feedback");
      			document.getElementById('errorMessage').style.display = 'block';
            	document.getElementById('thankYouMessage').style.display = 'none';
            });
        }
</script>Escalate your support from chat to Teams Meeting

Chat support escalation flow from self-service to Teams meeting with a live agent
You can now escalate support from chat (webchat or Teams chat) to Teams meetings. Which enables screen sharing for more complex technical issues.
Here's a detailed breakdown of each stage:
User Initiates Self-Service
First point of contact
User attempts to solve issue independently
Typically involves FAQ sections, knowledge bases, or automated troubleshooting guides
Reduces load on support staff
Available 24/7
AI Provides Assistance
Chatbot or AI system engages if self-service insufficient
Handles common queries and basic troubleshooting
Uses natural language processing to understand user issues
Can access knowledge base and provide solutions
Collects relevant information before potential human handoff
User Connects to Live Agent
Triggered when AI cannot resolve issue
Seamless transition with context preservation
Agent receives full interaction history
Handles complex issues requiring human judgment
Provides personalized support
Agent Creates Teams Meeting Link
Used for issues requiring visual demonstration
Enables screen sharing and real-time collaboration
Better for complex technical support
Allows multiple participants if needed
More personal than chat interaction
User Joins Teams Call
Direct video/audio communication
Screen sharing capabilities
Real-time problem resolution
Recording options for future reference
More efficient for complex explanations
Building a Self-Learning AI Help Desk with RAG & ChatGPT
How Would You Design a RAG Help Desk System with ChatGPT?
Think of it as a feedback loop:
1. Employee asks question
2. ChatGPT tries to help using company knowledge
3. Did it work?
- Yes → Done
- No → Goes to human agent
The clever part is how it learns:
- Managers see what ChatGPT couldn't answer
- They add missing knowledge through a simple form
- ChatGPT immediately uses this new information
- Future similar questions get answered automatically
The key is making it super easy for managers to spot and fill knowledge gaps. When they see unanswered questions in their dashboard, they can quickly add the right information and test if ChatGPT now handles similar questions correctly.

Visual on improving RAG for internal helpdesk
Using ChatGPT and Teams for Internal Helpdesk and knowledge base
ChatGPT and Teams are the perfect tools for helpdesk solutions.
How it works:
1. The AI (powered by ChatGPT) analyzes your question
2. Searches your company's internal knowledge base
3. Provides a conversational response that summarizes the relevant article
4. Shows you the complete support documentation within Teams
Real example:
Ask: "How do I connect the HP PageWide printer?"
The ChatGPT-powered AI will:
- Give you a clear, conversational answer
- Reference the specific knowledge base article
- Display the full guide with images and step-by-step instructions
- Keep everything within your Teams window
View KB article within Teams
How to upload documents or files for ChatGPT AI indexing
Reference .pdf, .pptx, .docx, etc. documents in AI chat
AI file reference example
This feature allows you to easily add reference files, so when you ask a question, AI can search for answers directly within the uploaded documents. Here’s how to upload your files and start using them:
Step 1: Go to the Manager Dashboard
Step 2: Navigate to the Manage FAQ Files Section: Under the FAQs dropdown menu, select Manage FAQ Files.
Manager dashboard
Step 3: Click on New FAQ File Item to begin uploading your document.

New FAQ File Item button
Step 4: Enter Title and Upload:
Provide a clear title for your file so it’s easy to locate later.
Click the upload button to select and upload your file.

New FAQ File form
Step 5: Publish Your File: Once uploaded, click Publish to make it accessible for AI search.
Important Note
After publishing, it may take up to 30 minutes for the AI to index the file. Once indexed, your file will be available for AI-powered search responses.
For any questions, reach out to our support team at support@instant-tech.com.
Make Your Teams App Available to Everyone in Organization
Authorize Teams app using App Permissions and Policy Settings
Step 1: Go to the Teams Admin Center
URL: Teams Admin Center
Description: Start by navigating to the Microsoft Teams admin center using the provided link. This dashboard allows you to manage all settings related to Microsoft Teams.

How to update the MS Teams App Permissions and Policies
Visit the MS Teams Admin Center where you will you update the MS Teams App permission policies
Step 2: Navigate to App Setup Policies
Path: Teams apps > Setup policies
Description: Once in the Teams admin center, find the sidebar menu. Click on "Teams apps," then select "Setup policies." This section lets you manage app setup policies for your organization.

Use the MS Teams Setup Policies to make the teams app available to everyone in the organization
Specify either Global (Org-wide default) or scope the policies for a smaller POC group or group of test users if required
Step 3: Select the Global (Org-wide default) Policy
Action: Click on "Global (Org-wide default)"
Description: In the "Setup policies" section, locate and click on the "Global (Org-wide default)" policy. This will allow you to manage and edit the default settings that apply organization-wide.

How to make teams app available to everyone
Use the Global org-wide default to make the teams app available to everyone, or every user, in organization
Step 4: Add the Chime V5 App
Action:
Click "+ Add apps" (this will render a sidebar on the right side of the page)
Search “Chime V5“ and add “Chime V5”
Click Add (to save)

How to make teams app available to everyone
Add apps as a step to make teams app available to everyone

Add an app to Microsoft Teams
Allow ChimeV5 to be installed across the organization and provide a high value chatbot for your service desk
Step 5: Confirm Addition of Chime V5
Description: Ensure that Chime V5 appears in the list of apps under the policy after adding it. This confirms that it has been authorized for use within your organization.

How to make teams app available to everyone in organization
Steps on wow to make teams app available to everyone in organization and distribute to all employees
Step 6: Save and Apply Changes
Action: Click "Save"
Description: After adding Chime V5 to your app policy, make sure to save the changes to update the policy settings across your organization’s Microsoft Teams setup.

Steps on deploying teams app to everyone in organization
This will allow the Teams app to be deployed to everyone in the organization - and the app will be deployed to their teams client
6 Steps to Apply Branding To Your Teams App
Customize Your App From The Teams Admin Center
By default, the service desk application has a default icon, and name, that will be displayed in the Microsoft Teams client. Some customers may want to provide a different icon, or name. Follow these instructions as a Teams Admin to update the branding.
Step 1: Go to the Teams Admin Center
URL: Teams Admin Center
Description: Navigate to the Microsoft Teams admin center using the link provided.
Navigate to your Microsoft Teams admin center where you can find you help desk app
This is the dashboard from where you can manage all settings related to Microsoft Teams.
Step 2: Navigate to Manage Apps
Path: Teams apps > Manage apps
Description: Once you are in the Teams admin center, locate the sidebar menu. Click on "Teams apps," and then select "Manage apps."

Within Teams admin center navigate to Manage apps to view your service desk app
This section allows you to view and manage all the Teams apps available to your organization.
Step 3: Select the App to Customize
Action: Find the app you need to customize and click the app name.
Description: In the "Manage apps" list, search for the app you wish to customize. Click on the name of the app to open its specific settings and customization options. For example, search “Chime V5” and click on “Chime V5“.

In the Manage apps page search for your service desk app you want to customize
You can use the search bar to find the app quickly.
Step 4: Enter Customization Mode
Action: Click the customize icon.
Description: After selecting the app, look for the customize icon. Click this icon to enter the customization mode for the selected app.

Select your service desk app and select the customize button
The customize icon looks like a pencil
Step 5: Make Your Changes
Description: In the customization mode, you can modify settings of the app. You are able to change visuals, and other settings to better suit your team's branding.
Action: Update any of the settings for App details, or Icons. For Icon updates, you will want to take a look at the Microsoft documentation for updating App Icons to make sure any changes you make are applied correctly. Primarily, you will want to make sure the Color Icon is exactly 192 x 192 pixels and the Outline Icon is exactly 32x32 pixels and either white with a transparent background or transparent with a white background. No other colors are allowed.
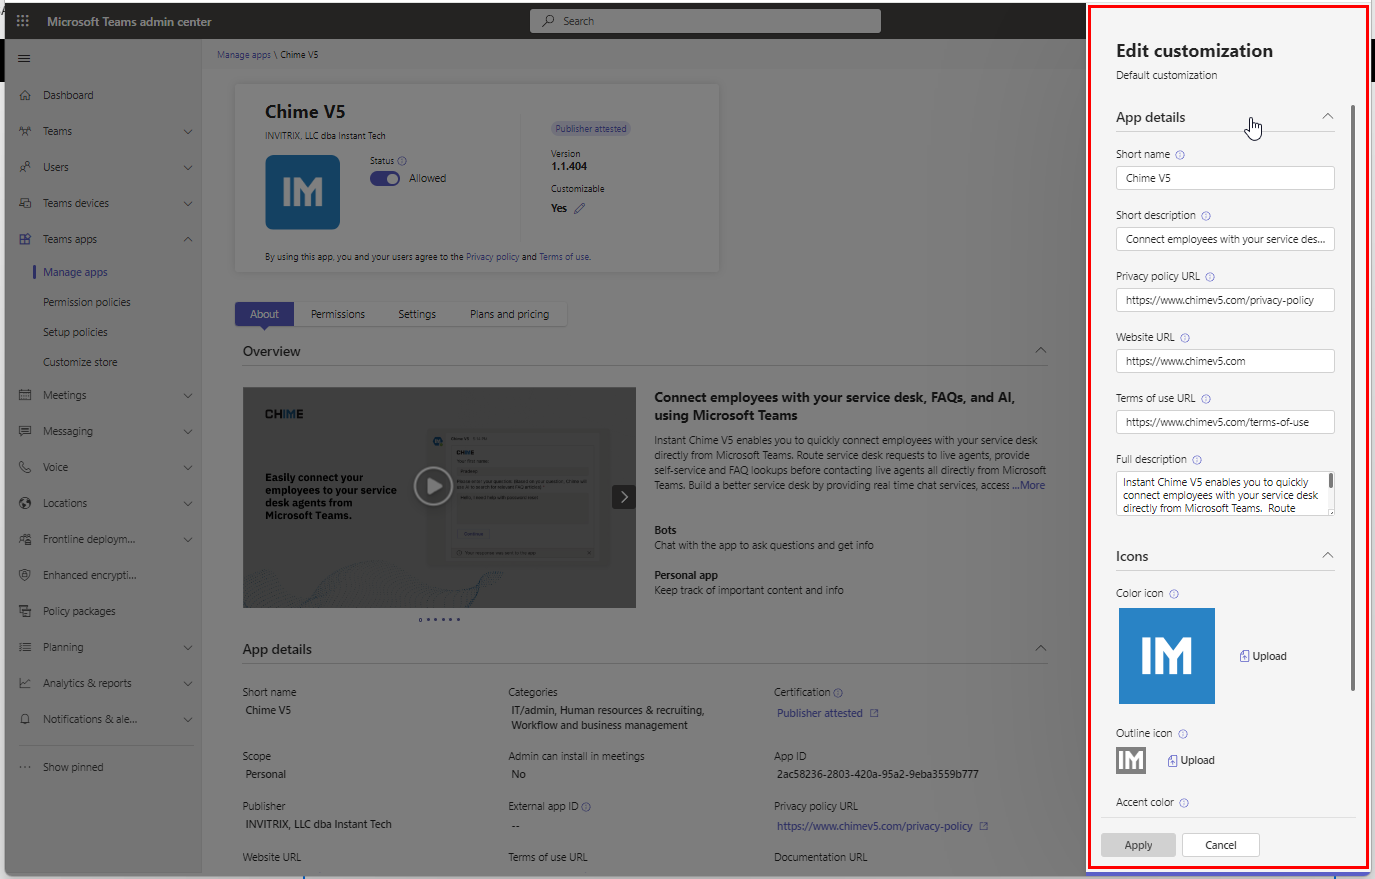
Within the customization menu you can edit the details of your service desk app
Key categories to edit include the short name, short description, and icons
Step 6: Apply Changes
Action: Click "Apply".
Description: After making the necessary changes, make sure to save and apply them by clicking the "Apply" button. This will update the app with your custom settings across your organization’s Teams platform.
Additional note on updating Teams apps:
After you have made any branding/styling changes to the Chime V5 Teams app during this process some users may see the old version of the app name or an old/broken app icon in their Teams client.
This can typically be fixed by having the user logging out of Teams and logging back in. If that doesn’t work, the user can go in and manually clear the cache in teams following this Microsoft guide: Clear the Teams client cache >>
Please contact us at support@instant-tech.com if you have any questions.
How to Create a Markdown Link on an FAQ
Set Links to Open In a New Tab

Markdown Editor
Use the Markdown Editor to style your article content
To create a Markdown link in an FAQ that opens in a new tab, you can use the following format:
[Link Text](URL){target="_blank"}Replace Link Text with the text you want to display for the link, and replace URL with the actual URL you want to link to.
Here's a breakdown of the attributes used:
target="_blank": This attribute tells the browser to open the linked document in a new tab or window.
So, for example, if you want to create a link to Google that opens in a new tab with the text "Google", you would write:
[Google](https://www.google.com){target="_blank"}How to Choose the Right Chat Base Enterprise Help Desk Solution for Your Business

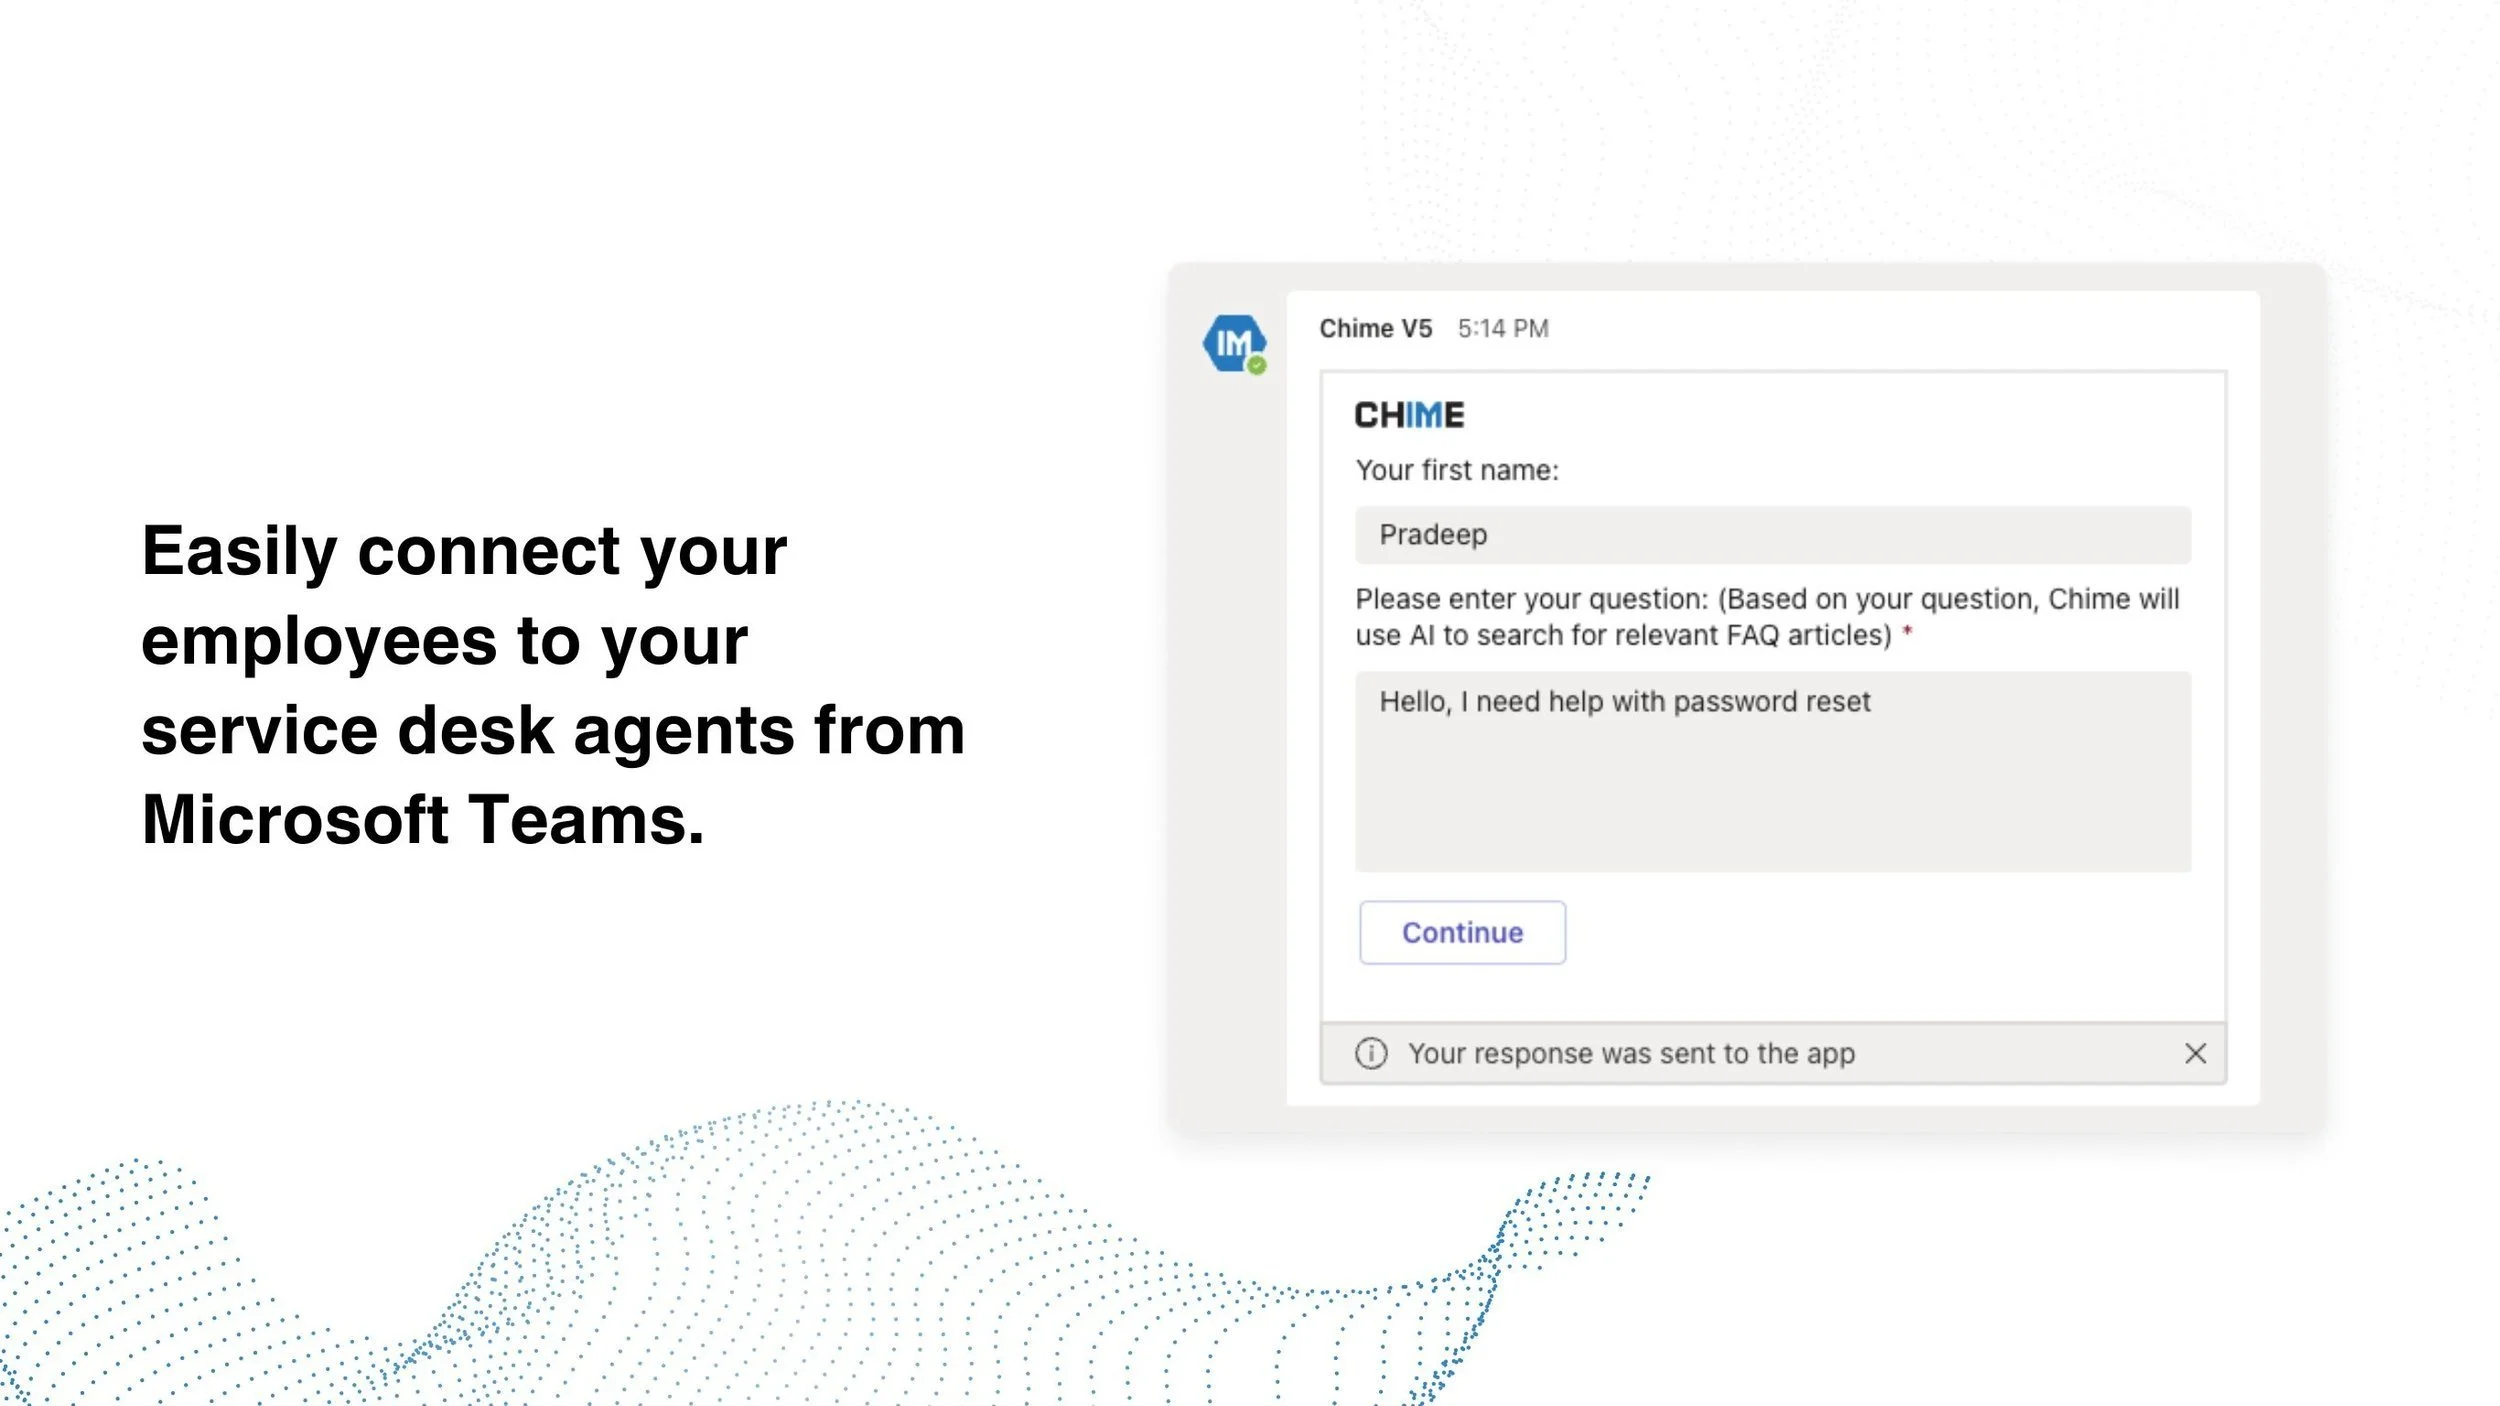
AI Assistance Within Microsoft Teams for Enterprise
AI chat-based help desk solution example of solving password reset (integrated in Microsoft Teams)
1. Introduction
Selecting the right help desk solution impacts both customer support and overall business operations. Here's why a help desk system is essential, as highlighted by Atlassian (https://www.atlassian.com/itsm/service-request-management/help-desk):
Email Isn't Enough: Relying on email for support requests is messy and inefficient. A Help desk software organizes and prioritizes queries, ensuring none fall through the cracks.
Employees Want Self-Service: Today's employees value autonomy. A help desk system often incorporates AI, FAQs and knowledge bases, letting customers find answers without waiting for a response.
Track Support Performance: Understanding your support's performance is important. With the right software, you can monitor metrics like ticket volume, resolution speed, customer satisfaction, and agent performance.
Leveraging AI for Efficiency: Modern help desks use AI to automate responses, route tickets effectively, and predict potential issues.
This guide will help you choose the right help desk solution for your business.
2. Understand Your Needs
Choosing the right help desk solution starts with understanding your business's requirements.
2.1. Assessing Your Current System:
Examine the current system in use. Employees might face certain issues, the ticket process might not be intuitive, and there could be integration challenges with other company tools.
Questions to Consider:
Are employees content with the current system?
What challenges does the current system present?
Are there unused or unnecessary features in your current system?
2.2. Forecasting Future Growth:
Think about your future needs. As your business grows, the number of support queries will likely increase.
Questions to Consider:
Where do you expect your business to be in a few years?
Will the help desk need to integrate with new tools or departments?
How quickly might the volume of support requests grow?
2.3. Listing Essential Features:
There are many features in help desk systems. Focus on what is essential for your business.
Questions to Consider:
What features are a must-have for your system?
Which features are secondary but still useful?
How do employee needs influence your feature choices?
By addressing these questions and understanding your needs, you'll be better prepared to select a suitable help desk solution for your business.
3. Key Features to Consider
When selecting a help desk solution, it's crucial to zero in on features that align with your business needs. Here's a breakdown of some key functionalities to consider:
3.1. Ticket Integration:
Automate your ticket management. By automating ticket creation and management, you can ensure a more streamlined and timely response to employee queries, reducing manual overhead and the potential for errors.
3.2. Integration Capabilities:
A robust help desk system shouldn't operate in isolation. It needs to seamlessly integrate with other tools and software used within your enterprise. For instance, consider the benefit of integrating with Microsoft Teams. This platform, already familiar to many employees, can be leveraged to enhance communication and collaboration around support tasks.
3.3. Reporting and Analytics:
Insights drive improvement. A good help desk solution will provide comprehensive tools to assess performance, from ticket resolution times to user feedback. An essential feature to consider is custom reporting. This allows businesses to create custom reports, querying specific data sets that align with their unique operational metrics.
3.4. Customization:
No two businesses are the same, and your help desk software should reflect that. The ability to customize the system—from the web client user interface to workflow automation—ensures that the tool aligns closely with your specific business operations and needs.
By focusing on these features, you can ensure that your chosen help desk solution not only addresses your immediate requirements but also positions your business for future growth and challenges.

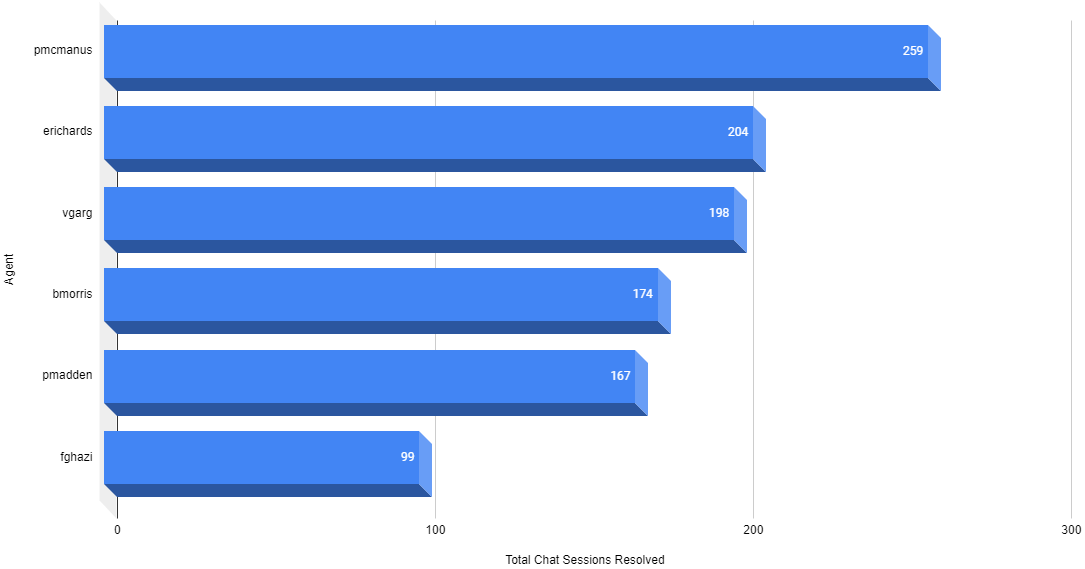
Create reports from your chat workflow helpdesk
Help desk reports graph UI: Rendering connected inbound chats over time
4. Consider User Experience
To maximize the efficiency and effectiveness of your help desk system, prioritize user experience. A user-friendly system speeds up tasks and reduces frustration, benefiting both your support team and the end-users they assist.
4.1. Intuitive Interface:
Opt for a system with a clear and straightforward layout. Simple navigation means less time searching for functions and more time resolving issues. When evaluating options, think about whether a new team member could quickly get the hang of it. If it seems complicated, users might avoid or misuse essential features.
4.2. Chat-Based Support:
Integrating chat into your help desk system offers numerous advantages. Chat provides real-time interaction, allowing for immediate clarification and faster resolution. Users often prefer chat because of its convenience and the instant feedback it provides. For support agents, chat can be more efficient than phone or email, as they can handle multiple chat sessions simultaneously.
4.3. Self-service Options:
Empower users by providing self-service options. A comprehensive knowledge base, FAQs, and integrated AI chatbots allow users to find answers on their own. This not only reduces the workload for support agents but also gives users the satisfaction of resolving issues without having to wait for assistance.
4.4. Agent-Assist AI:
Leveraging AI to assist support agents can be a game-changer. Agent-Assist AI provides real-time suggestions to agents, helping them address queries more efficiently. By analyzing the context and history of conversations, AI can recommend solutions, draft responses, or even automate repetitive tasks, enabling agents to focus on more complex issues and improve overall response times.
5. Implementation and Migration
The migration should be smooth, with minimal disruption to your ongoing operations. Here are some key areas to focus on:
5.1. Onboarding:
Effective onboarding introduces your team to the new system's tools and processes. Collaborate with the software provider to understand the onboarding tools they offer, such as tutorials or interactive guides, and ensure that your team feels comfortable and confident with the new system from day one.
Onboarding Checklist:
Onboarding Tools: Explore and use the tools provided for a smooth onboarding process.
Integration Testing: Ensure the new system integrates seamlessly with your existing tools.
User Training: Schedule sessions to get your team acquainted with the new system.
Time Frame Agreement: Establish a timeline with the software provider for the entire onboarding process.
Feedback Mechanism: Set up a system for collecting feedback in the early stages of the new system's use.
System Tweaks: Make adjustments based on feedback and initial usage for optimal performance.
Continuous Monitoring: Monitor the system's performance during the initial weeks to address any issues promptly.
5.2. Integration with Current Tools:
Your new help desk system should seamlessly integrate with the tools you already use, like CRM software, communication platforms like Microsoft Teams, and other essential software like ServiceNow. Proper integration streamlines operations and reduces potential errors.
5.3. Time Frame:
Onboarding to a new system takes time. Set realistic expectations for how long it will take to get your team fully acclimated. A clear timeframe aids in planning and minimizes disruption. Engage with the software provider to determine a precise timeline.
6. Testing
It's essential to test the before making a full commitment. Here's how you can approach it:
6.1. Free Evaluations/Trials and Demos:
Many help desk software providers offer free trials or demo versions of their platforms. Utilize these opportunities to get a hands-on experience with the software. It allows you to test its capabilities, user-friendliness, and how well it aligns with your business needs.
6.2. Engage Your Team:
Your support team will be the primary users of the help desk system. It's crucial to involve them in the evaluation process. Let them test the software, use its features, and simulate real-life scenarios. Gather their feedback regarding ease of use, functionality, and any potential challenges they foresee. Their insights can be invaluable in making an informed decision.
Testing Checklist:
Trial Signup: Register for any available free trials or demo versions of the software.
Feature Exploration: Familiarize yourself with the main features and functions during the trial.
Real-life Simulation: Try simulating real support scenarios to evaluate system performance.
Team Involvement: Ensure multiple team members, especially those who will use the system frequently, participate in testing.
Feedback Collection: Set up a mechanism to gather detailed feedback from team members during the trial period.
Integration Test: Check how well the system integrates with your current tools during the trial.
Performance Metrics: Monitor any available performance metrics or analytics during the trial.
Support Inquiry: Test the responsiveness and quality of the software provider's support during the trial.
Decision Meeting: After the trial, hold a team meeting to discuss experiences and decide on the next steps.
7. Conclusion
Selecting the right help desk solution is more than just ticking off a list of features. It's about ensuring that the software integrates easily into your business operations, empowering your team to deliver the best support. The choices you make will have long-term implications for your team's efficiency and, ultimately, the satisfaction of the users they assist.
Taking shortcuts in the selection process can lead to challenges down the line. Therefore, it's important to invest time in thorough research, hands-on testing, and team feedback.
By approaching this decision with the care and diligence it deserves, businesses can ensure they choose a help desk solution that truly aligns with their unique needs and goals.
09-11-2023 ChatBot Load Testing Report

Even chatbots should be load tested - example of what we do
Here are some load testing results from our chatbot testing last September. We generate these using C# and Azure DirectLine
Summary
The goal of this load testing is to demonstrate Chime V5's scalability to handle significant load between support agents and end-users in a large enterprise.
Typically, our Chime customers route, or receive, approximately 1% of the total employee population\user base, as inbound conversations for day. In this example, our load test demonstrates Chime V5 routing approximately 1,000 inbound service desk chats in a brief 4 hour period.
Outcome: Handled 1,101 chats in 4 hours and 40 minutes.
Overview
Total Chat Sessions: 1,101
Load Test Duration: 4 hours and 40 minutes
First Chat Started: 9/11/2023 08:58:00
Last Chat Started: 9/11/202313:38:00
Wait Times
Maximum Wait Time: 1 minute and 53 seconds
Minimum Wait Time: 3 seconds
Average Wait Time: 8 seconds
Automated Agent Performance
Chatbots need to perform - so they need load testing - we use C#
Our C# load testing application simulates real user load (chat sessions) and forces the engine to handle many concurrent chats over a long period of time
How to Add FAQ Article Into Tenant Landing Page (a Video Guide)
Enhance User Access with Featured FAQs
Overview of the Tenant Landing Page
The tenant landing page consists of two main components:
Header: Includes header text and a search bar.
Cards Container: In Chime V5, each card is called Featured Content.
Understanding Featured Content Cards
A Featured Content card contains a list of FAQ articles. As a manager, you have the ability to add or remove FAQ articles within these cards.
Purpose of Featured Content: Featured Content brings selected FAQ articles into focus on the landing page. If your platform has thousands of FAQ articles, using Featured Content helps the selection to display only the articles deemed most useful or important.
Steps to Add an FAQ Article to a Featured Content Card
Step 1: Access the Manager Dashboard
Log into your account and go to the Manager Dashboard.
Step 2: Navigate to Content Section
From the dashboard, proceed to the "Content" menu and then to "Featured Content."
Step 3: Choose the Card to Edit
Identify and click on the Featured Content card where you wish to include a new FAQ article.
Step 4: Search and Add the FAQ Article
Utilize the search function to find the FAQ article you want to feature. Once found, add it to the selected Featured Content card.
Step 5: Publish the Changes
After adding the FAQ article, complete the update by clicking the "Publish" button.
Verifying the Update
To confirm that the FAQ article has been added successfully, navigate back to the tenant landing page. Check that the Featured Content card now includes the new FAQ article you have added.
By following these steps, you'll be able to highlight key information on your tenant support landing page, making it easier for users to find what they need.
Create Effective FAQ Articles to Solve Employee Issues
Step-by-Step Guide to Building FAQ Chatbots
Introduction
This guide walks you through the steps for creating a new FAQ article in Chime V5. Chime V5 is a real time service desk using chat to ehlp employees quickly resolve problems. With the advent of AI, content is king and the inclusion of content management systems (CMS) into serivce desk applications allow new AI systems to quickly index helpful content and provide these solutions via chat and other UI.
Managers and admins have the rights to create FAQ articles. If you're an agent, this feature is not available for you. By the end of this blog post, you will know how to:
Locate where all FAQ articles are
Create a new FAQ article
Preview the FAQ article
Publish the FAQ article
Prerequisites: A Chime V5 account with manager or admin rights.
Steps to Create an FAQ Article
Step 1: Go to the “Manager Dashboard”
Log in to your Chime V5 account. Once logged in, navigate to the manager dashboard.
Step 2: Navigate to “Content > FAQ”
On the manager dashboard, look for the "Content" tab. Click on it, then select the "FAQ" sub-menu.
Step 3: Click on "New FAQ Item" Button
Within the FAQ page, you'll find a button labeled "New FAQ Item." Click this button to initiate the creation of a new FAQ article.
Step 4: Add Title
A new screen will appear, prompting you to enter a title for the FAQ article. Make sure the title is relevant and clear.
Step 5: Add Markdown for FAQ Article Content
Below the title, there's a space where you can add the content of your article. Chime V5 allows for Markdown formatting. Enter the content accordingly, using Markdown for any specific formatting needs.
Step 6: Preview the FAQ Article
After entering the content, scroll down to find the "Preview" button. Click on it to see how your FAQ article will appear once it's live. This helps ensure that the content is formatted correctly and looks good.
Step 7: Publish the FAQ Article
Once you're satisfied with the preview, find the "Publish" button. Click on it to make your FAQ article public and accessible to those who use the Chime V5 platform.
Conclusion

FAQs display directly in a Microsoft Teams chat -
Deploy a great FAQ chat system to deliver solutions to your employees - you build the FAQs, we build the chat app - and it’s deployed as a SaaS app in days, not weeks.
Creating an FAQ article in Chime V5 is straightforward. This feature is beneficial for managers and admins who want to disseminate information to everyone.
Setting Up a Chat-Based Help Desk in Microsoft Teams
Transform Microsoft Teams into an Efficient Help Desk
This blog post is tailored for IT managers, business owners, and regular Microsoft Teams users who are looking for an efficient way to streamline internal help desk operations. The main goal of Chime V5 is providing a ‘real time’ service desk so that employees can quickly use chat to engage with their enterprise service desk. Of course, the underlying goal is to quickly resolve employee issues (questions) so that people can quickly ‘unstick’ a problem and continue to add value and handle their high value tasks.
Table of Contents
Introduction
Solving Traditional Help Desk Challenges
Single Point of Contact
Troubleshooting
Performance Monitoring
Scalable Support
Primary Features
Chat-Based Help Desk
Immediate Engagement and Dynamic Prioritization
(Work in progress) How to Setup Help Desk on Microsoft Teams
Installing and Integration with Microsoft Teams
Creating a Chat Workflow
Enabling Chat Workflow in Chime V5 Tenant for Microsoft Teams Integration
Initial Testing and POC
Technical Setup
Creating Chat Support Channels
General Support Channel
Specialized Channels (e.g., IT, HR, Finance)
Setting up Chatbots and AI
Initial Setup and Configuration
Defining Escalation Paths
Roles and Permissions
Defining Roles (Admin, Manager, Agent, User)
Setting Permissions
Reporting and Monitoring
Metrics to Track
Setting up Dashboards
Custom Reports
User Onboarding
Internal Announcements
Training Support Agents
Roll Out
Pilot Testing
Collecting Initial Feedback
Full Launch
Introduction
Employees need to quickly solve problems - and chat is a great channel to solve employee issues. Chats can be started using Microsoft Teams either on a Windows desktop, table, iPad, mobile device, or via a web chat client in a browser. As businesses grow, their needs for an efficient and scalable internal help desk grow as well. One of the major challenges has always been how to centralize support, offer immediate solutions, and provide scalability without complicating the user experience. This is where Chime V5 comes into play, turning Microsoft Teams into a fully functional, chat-based help desk.
Solving Traditional Help Desk Challenges
Here's how Chime V5 addresses the inherent challenges in traditional help desk models:
Single Point of Contact
Chime V5 integrates seamlessly with Microsoft Teams, a platform that your employees are already familiar with. It becomes a centralized point for all help-desk related queries, thereby reducing the learning curve.
Troubleshooting
With Chime V5, troubleshooting becomes as easy as sending a chat message. Your IT support agents can receive and resolve issues in real-time, without the cumbersome ticket queues that could take days to resolve.
Performance Monitoring
Chime V5 offers robust monitoring and reporting features. The data collected can be invaluable for performance evaluations, strategic planning, and scaling operations. In addition, you can create a custom report in Chime V5.
Scalable Support
The Problem: As enterprises grow, the internal support structure often struggles to keep up. This challenge manifests in several ways, from increased ticket volume and longer resolution times to overwhelmed support agents and dissatisfied employees. The process of scaling usually involves adding more agents, integrating new tools, or even overhauling the entire system. These approaches often come with a high financial and operational burden.
The Solution with Chime V5 and Microsoft Teams: Chime V5 provides a solution to this conundrum by integrating seamlessly into Microsoft Teams, a platform already likely in use in your enterprise. This allows your support structure to scale without the need for entirely new platforms, extensive training, or complex integrations.
Resource Optimization: As more support agents may be needed to cater to a growing workforce, Chime V5 allows the easy onboarding (addition) of new agents.
Consistency: As your company scales, maintaining a uniform approach to support can be difficult. With Chime V5 in Microsoft Teams, the user experience remains consistent, whether you have 50 or 5,000 employees.
Automated Chat Bot: With Azure ChatGPT AI, Chime V5 can provide self-service help in addition to the support agents to all employees.
Data-Driven Decision Making: Chime V5’s robust performance monitoring features allow for data-driven decisions. As you grow, you can use the analytics to identify bottlenecks, allocate resources more efficiently, and even foresee issues before they become critical.
Streamlined User Experience: With Chime V5, your employees won't have to learn a new platform as you scale. This is a huge advantage in reducing onboarding time and maintaining high levels of user satisfaction.
Adaptability: Chime V5’s chat-based model can easily adapt to incorporate new features or third-party integrations, ensuring that your help desk platform is as agile as your business needs.
Why Microsoft Teams? Microsoft Teams itself is designed to be a scalable solution, fitting well into both small business environments and large enterprises. Its wide range of functionalities—like chat, video conferencing, and file sharing—make it an ideal platform for centralizing operations, including your help desk. By leveraging a platform already in use and accepted by your staff, Chime V5 makes it possible to add a powerful, scalable help desk solution with minimal disruption.
Primary Features
Here's why Chime V5 is indispensable for this setup:
Chat-Based Help Desk
Chime V5 harnesses the chat functionality in Microsoft Teams to offer an easy, intuitive, and quick way for employees to seek solutions. Whether it's a simple query that the AI can handle or a complex issue that requires a support agent, the chat-based approach speeds up resolution time and enhances user satisfaction.
Immediate Engagement and Dynamic Prioritization
Unlike traditional ticketing systems, Chime V5 offers immediate engagement and uses customizable algorithms (chat workflow) to resolve employees’ issues. In addition you can integrate with your existing ticketing system to automate your ticket creations.
How to setup Help Desk on Microsoft Teams
The primary objective is to deploy a user-friendly help desk application accessible to all employees through Microsoft Teams. Additionally, we want to set up a dedicated tenant in Chime V5 for support agents and managers.
By the end of this, your employees will have a new app menu on the Teams sidebar. This app will be their main way to ask for help. When they ask questions, a smart chat system will make sure their messages reach the right support agents quickly.
Installing and Integration with Microsoft Teams
Setting up Chime V5 is a straightforward process. Here are the steps:
Find Chime V5 in the Microsoft Teams Store: Visit the Microsoft Teams store and find Chime V5 using this link: Chime V5 on Microsoft Teams Store.
Install Chime V5: Once you've found Chime V5, click on the "Get it now" button to add it to your Teams environment.
Request an Evaluation: After installation, you can create a request for an evaluation.
Evaluation Request Notification: Your evaluation request will be received by our team at Instant. We'll promptly notify you regarding the status of your request.
Chime V5 Tenant Creation: Upon approval, we will create a dedicated Chime V5 tenant for your organization.
Receive Account Credentials: Once your Chime V5 tenant is set up, we'll provide you with your account credentials (username and password) to access your tenant.
Installation is Now Complete: Your Chime V5 Teams app is now connected to the Chime V5 tenant. In the next steps, we'll guide you through setting up the tenant so that inbound support chats from the Teams app are routed to the tenant's chat workflow and directed to support agents.
Creating a Chat Workflow for Teams Help Desk
The integration of Chime V5 with Microsoft Teams is a crucial step in establishing a seamless help desk experience. In this section, we'll guide you through the process of updating the chat workflow for your Chime V5 tenant.
Customizing the Chat Workflow for Managers:
Within the manager's dashboard, you have the opportunity to shape the chat workflow to suit your organization's requirements. This workflow serves as a framework that influences how incoming help/support chats are managed and directed.
Key Workflow Capabilities: The chat workflow offers a range of capabilities that can be designed to align with your specific needs:
Creating Tickets on ServiceNow: Automatically generate tickets in your ServiceNow system when employees initiate chats, streamlining issue tracking and resolution.
Running Custom JavaScript: Execute custom JavaScript to perform specific actions, integrate with other systems, or provide dynamic responses to users.
Sending Email Notifications: Notify relevant parties via email when specific events occur within the chat workflow, ensuring timely communication.
Routing Users to Agents: Direct incoming chat requests to available support agents based on predetermined criteria, ensuring optimal resource allocation.
Routing Users to AI: Utilize AI-powered assistance for certain queries, providing immediate responses and freeing up human agents for more complex issues.
Creating a Simple Chat Workflow:
In this example, we'll create a basic chat workflow that directs inbound chats to support agents. Currently you are the only user (with admin role) in your Chime V5 tenant. But because an admin has all rights including accepting chats like an agent, for testing purposes, we are going try acting as an agent with our admin account.
Step 1: Navigate to Manager Dashboard > Pipelines.
In Chime V5, a chat workflow is called a pipeline. By default, you are given 2 pipelines: Route To Agents and FAQ Workflow And Route To Agents.

Enable a chat channel, with FAQ lookup, integration with AI, and routing to agents
The new chat channel is deployed using Microsoft Teams, can be pushed across the organization, and installed via the Microsoft Teams Store
To check the content of a chat pipeline, click on the Route To Agent text link.
Scroll down to the bottom, and you will see the pipeline diagram.

A simple chat bot delivered using Microsoft Teams
This chat service will collect the employee’s question and then the chat to a service desk agent - anywhere in the world
The diagram tells you how the chat workflow starts and ends. From looking at this diagram, we can see that the chat workflow sends a welcome card, before routing the user to support agents. Once chat with agents completed, chat workflow is going to send user a feedback card. Finally, chat will end.
Now let’s go back to Manager Dashboard > Pipelines. You should see list of chat pipelines again.
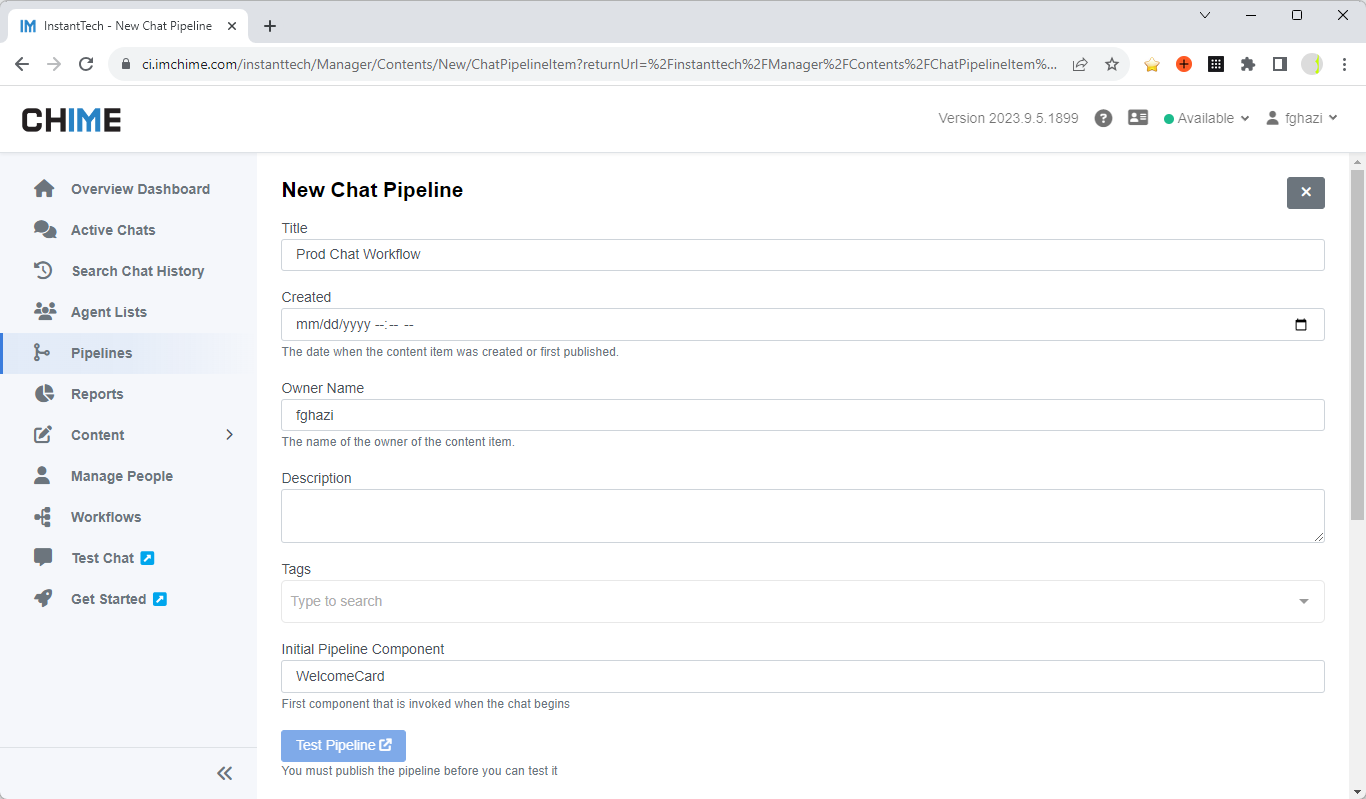
Step 2: Click on New Chat Pipeline button.
Step 3: Fill in the Title field and the Initial Pipeline Component field. For example:
Title: Prod Chat Workflow
Initial Pipeline Component: WelcomeCard
Deploy a simple chatbot in less than a day - using Microsoft Teams
The chat bot is designed to solve employee problems using FAQ lookups or route to service desk agents - you can also enable AI features
Step 4: Scroll to the bottom while still on the New Chat Pipeline page.
Step 5: Click on Edit tab.
Step 6: Click on the Add Item button dropdown and select Send AdaptiveCard Pipeline Item to use the adaptive card

Use Microsoft Adaptive Cards with your chatbot
Adaptive Cards work great in Microsoft Teams and are a great chat UI - easily collect info and deliver chat replies using cards
Step 7: Set the Key of the adaptive card to be WelcomeCard.

Configure an adaptive card to collect the question - and then deliver some FAQs, route to an agent, or engage with AI
Microsoft Adaptive Cards are a great UI for chat sessions - and work great in Microsoft Teams
Step 8: Scroll down and update the Card Template.

Launch the embedded adaptive card editor
Adaptive Card editor as part of our chat application
Step 9: Scroll down and click Publish.
Congratulations, you just created a new chat pipeline (chat workflow).
Workflow Flexibility: Remember, the chat workflow is highly versatile. As your needs evolve, you can expand the workflow to include advanced features such as ticket creation, AI assistance, and more.

Quickly deploy a chat service to solve employee problems
Chime ships with several great chatbot examples - or build your own. Use FAQ lookups and the CMS to update the bot based on problems
Enabling Chat Workflow in Chime V5 for Microsoft Teams Integration
After creating your chat workflow, the next step is to enable it within your Chime V5 tenant. This ensures that any chat originating from Microsoft Teams will be correctly routed to Chime V5. Below are the steps to accomplish this. Note that admin access is required to proceed.
Awesome chat pipelines - use a preconfigured chatbot to solve issues and route chats
Chat workflows are made up of chat components - including FAQ lookup, sending adaptive cards, routing to agents, and collecting feedback
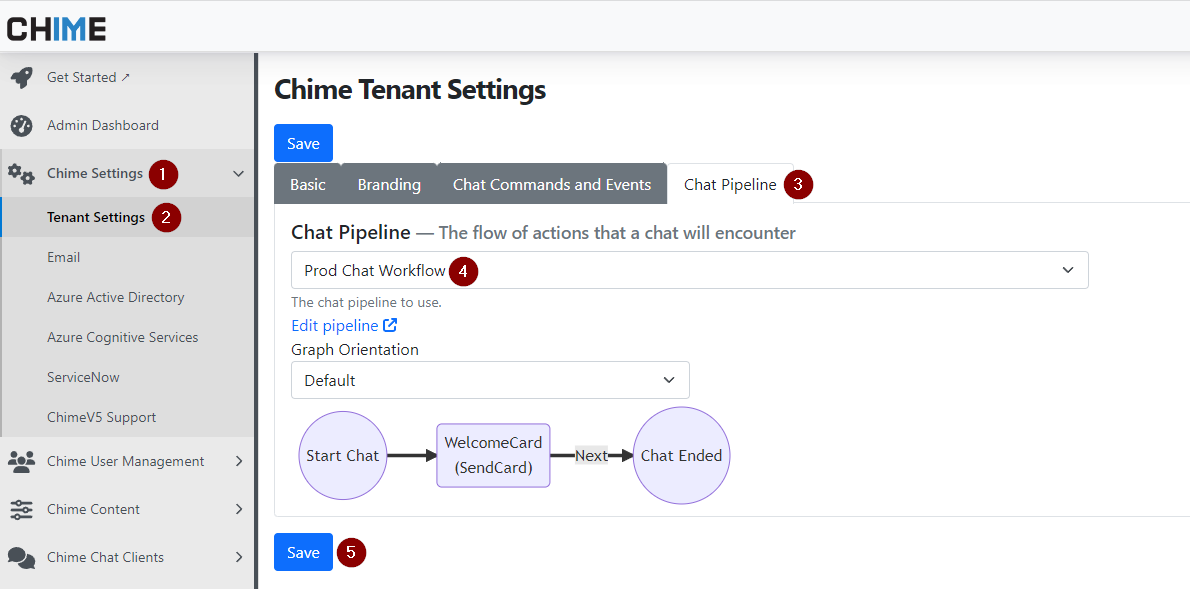
Steps to Enable Chat Workflow:
Access Tenant Settings: Start by going to Admin > Tenant Settings > Chat Pipeline in the Chime V5 interface.
Find Chat Pipeline Dropdown: Within the tenant settings, look for the chat pipeline dropdown menu.
Select Workflow: Choose "Prod Chat Workflow" from the dropdown, which is the chat workflow you previously created.
Save Settings: To finalize your configuration, click the "Save" button.
By following these steps, you ensure that your newly created chat workflow is active and any chats initiated from Microsoft Teams will route to your Chime V5 tenant effectively.
Initial Testing

Test your chatbot from within Microsoft Teams
Use chat as a new channel for your service desk or HR department - solve common questions quickly!
Once you've successfully enabled the chat workflow in your Chime V5 tenant, it's crucial to conduct initial tests to verify that the integration with Microsoft Teams is working as expected.
Steps for Initial Testing
Open Microsoft Teams: Launch the Microsoft Teams application on your computer or device.
Navigate to Chime V5 App: Within Microsoft Teams, locate and open the Chime V5 app.
Send Test Message: Type the word "hello" into the chat interface and send the text message.
Verify Welcome Message: After sending the test message, look for a welcome text message in response. This confirms that the chat workflow is operational and that chats are being correctly routed to your Chime V5 tenant.
Modernize IT Help-Desk Management with Microsoft Teams
Add AI Chat Channel and Solve Employee Issues
Chat for Employee Issues
Chat is a great way to solve common employee issues. It’s quick, available everywhere, supports multiple languages, and can provide FAQs and answers fast. For more complex issues, it can route requests to service desk agents globally.
Innovations in IT Help-Desk Management
IT help-desks are changing thanks to tools like Microsoft Teams. Ticket systems are being replaced with real-time solutions. Teams make it easier for users to get help, manage incidents, and improve workflows.
Using Microsoft Teams
Accessibility: Microsoft Teams makes it easy for users to get help. Instead of complicated processes, users can start a chat in the app to get help quickly.
Incident Management: Microsoft Teams integrates with systems like JIRA, ServiceNow, and SolarWinds. This makes logging, tracking, and resolving issues simpler.
Managing High Demand: Microsoft Teams can handle high volumes of requests by automating support tasks. It routes queries to the right channels or agents, which is crucial for large or fast-growing organizations. Chime aims to provide self-service and deflection opportunities for inbound chat sessions, including:
- Showing open tickets for users
- Using ChatGPT for conversational help
- Identifying keywords and searching FAQs before routing to an agent
Driving Digital Transformation with Microsoft Teams
Digital transformation in IT help-desk management means using advanced analytics, continuous feedback, and strong integration capabilities. Microsoft Teams enables a culture of constant improvement, allowing IT operations to keep up with technological changes.
Proactive Monitoring and Issue Resolution
Your IT help desk in Teams can monitor live conversations to detect and resolve issues immediately. Conversations can be organized into reports for better insights and future planning.
User Self-Help with Microsoft Teams
Microsoft Teams supports user self-help with an intuitive design and AI-powered bots that answer basic queries. This reduces the number of trivial issues that need human intervention, letting support staff focus on more complex tasks.
Unified Help-Desk Experience
Microsoft Teams acts as a hub that integrates various IT support functions. It creates a seamless user experience, centralizing tools and functionalities to simplify interactions and speed up resolutions.
Future Directions and Innovations
Microsoft Teams continues to evolve with new features and integrations. This ensures that platforms like Chime V5 stay at the forefront of IT help-desk management, providing efficient support that aligns with business goals.
Conclusion
Traditional IT help-desks are being replaced by more modern platforms. These platforms automate tasks, enable real-time collaboration, and offer comprehensive IT support. Now is the time to integrate Microsoft Teams into your IT help-desk strategy for faster and more effective support.
Introduction to Enterprise Service Desk
The objective of this document is to provide IT managers with an introduction to enterprise service desks and their key features. It aims to explain the purpose and benefits of an enterprise service desk solution, as well as highlight the important features that can enhance the efficiency and effectiveness of IT support within an organization. However, Chime is 100% on proving a real-time chat channel to your service desk - using Microsoft Teams, a we chat client, or other Microsoft DirectLine channels. Of course, Chime V5 provides integration with ChatGPT, language translation, integration with ticketing systems, and real-time routing to agents.
Table of Contents
Definition and Purpose of Enterprise Service Desk
Key Benefits of Enterprise Service Desk
Key Features of an Enterprise Service Desk Solution
Conclusion and Summary
What is an Enterprise Service Desk?
Definition and Purpose
An enterprise service desk is a centralized system that manages and resolves IT-related issues, service requests, and inquiries within a large organization. Its purpose is to streamline communication between employees, customers, and various IT support teams, ensuring timely and effective support for technical and non-technical issues.
Key Benefits
Improved operational efficiency: By automating routine tasks and workflows, the service desk solution reduces manual intervention, increases productivity, and streamlines processes.
Quicker issue resolution: With a centralized ticketing system and self-service portal, users can easily report issues and find solutions, leading to faster issue resolution.
Reduced support workload: The self-service portal and extensive knowledge base empower users to troubleshoot common problems independently, reducing the number of support requests and easing the workload on support agents.
Better visibility and control: Reporting and analytics features offer insights into service desk performance, agent productivity, and user satisfaction, enabling organizations to identify areas for improvement and make data-driven decisions.
Integration capabilities: Seamless integration with other IT management tools and systems allows for a more comprehensive and efficient IT support infrastructure.
Enhanced security and compliance: The service desk solution should incorporate security measures, such as user authentication and data encryption, to protect sensitive user information and comply with relevant regulations.
Customization and personalization: The solution should be customizable to match the organization's branding and requirements, providing a personalized experience for users.
Scalability: As the organization grows, the service desk solution should be able to scale without compromising performance and user experience.
Key Features of an Enterprise Service Desk Solution
Centralized Support System
A centralized support system is a core feature of an enterprise service desk solution. It serves as a single point of contact for users to submit their requests, report issues, and track the progress of their inquiries. This centralized approach ensures that all communication and support activities are efficiently managed and coordinated.
By having a centralized support system, organizations can streamline their support processes, avoid duplicate efforts, and eliminate the need for users to contact multiple support teams or departments. This improves communication and collaboration among IT support teams, leading to faster issue resolution and increased customer satisfaction.
Furthermore, a centralized support system enables support agents to have a holistic view of all support requests, allowing them to identify patterns, track trends, and provide proactive support. It also facilitates effective escalation and delegation of internal issues to the appropriate teams or individuals, ensuring that requests are addressed by the most qualified personnel.
Multi-Channel Support: Web chat and Microsoft Teams
Multi-channel support allows users to access support and communicate with IT teams through various channels, ensuring flexibility and convenience. Two popular channels for multi-channel support are web chat and Microsoft Teams.
Web chat is a real-time communication channel that enables users to interact with support agents directly through a website or a dedicated chat widget. This channel provides instant assistance and allows users to ask questions, report issues, and receive timely responses. It eliminates the need for users to wait for email or phone support, resulting in faster issue resolution and improved customer satisfaction. Web chat also allows support agents to handle multiple conversations simultaneously, increasing their efficiency and productivity.
Microsoft Teams, on the other hand, is a collaboration platform that integrates various communication and productivity tools into a single interface. It provides a centralized hub for teams to collaborate on projects, share files, and communicate in real-time through chat, voice, and video calls. By incorporating Microsoft Teams into the enterprise service desk solution, users can access support directly within their collaboration workspace. They can initiate chats with support agents, share screenshots or files, and receive assistance without leaving the platform they are already working in. This integration enhances productivity and streamlines communication, resulting in faster issue resolution and improved user satisfaction.
Both web chat and Microsoft Teams offer advantages in terms of accessibility and convenience. Web chat allows users to access support from any device with internet access, while Microsoft Teams provides a seamless experience for users already using the platform for their daily work. Furthermore, the integration of web chat and Microsoft Teams within the enterprise service desk solution enables users to choose the channel that best suits their needs and preferences, ensuring a personalized and efficient support experience.
Self-Service Portal Powered By Microsoft Azure ChatGPT
One of the key features of an ideal enterprise service desk solution is a self-service portal. This portal empowers users to find solutions to common issues and request services without the need to contact support. To further enhance the self-service experience, many organizations are turning to artificial intelligence (AI) solutions like Microsoft Azure ChatGPT.
Microsoft Azure ChatGPT is a powerful AI-powered chatbot that can be integrated into a self-service portal. It uses natural language processing and machine learning algorithms to understand user inquiries and provide accurate and relevant responses. With its advanced language capabilities, Azure ChatGPT can understand complex questions, provide step-by-step instructions, and even offer personalized recommendations based on user preferences and past interactions.
By integrating Azure ChatGPT into the self-service portal, organizations can offer their users a more intuitive and interactive support experience. Users can simply type their queries into the chatbot interface, and Azure ChatGPT will provide instant responses, guiding them towards the right solutions. This reduces the dependence on human support agents and allows users to find answers to their questions anytime, anywhere.
Azure ChatGPT can also be customized and trained to understand specific technical terms, industry jargon, and company-specific processes. This ensures that the chatbot provides accurate and contextual information to users, further enhancing the self-service experience. Additionally, Azure ChatGPT can learn from user interactions and continuously improve its responses over time, making it even more effective in addressing issues and providing accurate information and assistance.
FAQ Articles
FAQ articles provide users with a centralized knowledge base of frequently asked questions and their corresponding answers, helping them troubleshoot common issues independently. By incorporating FAQ articles into the self-service portal, organizations can reduce the number of support requests and improve user satisfaction.
FAQ articles should be comprehensive, well-organized, and easily accessible. They should cover a wide range of topics, including common technical problems, software usage guides, service request procedures, and other relevant information. Each article should provide clear and concise instructions, with step-by-step guides if necessary, to help users resolve their issues without assistance.
To create effective FAQ articles, organizations should consider the following best practices:
Identify common user queries: Analyze support tickets and user inquiries to identify recurring issues and questions. These will serve as the basis for the FAQ articles.
Organize articles in a logical manner: Categorize the FAQ articles into relevant topics or sections to make it easier for users to navigate and find the information they need.
Use clear and concise language: Write the articles in simple and easy-to-understand language, avoiding technical jargon as much as possible. This ensures that users can comprehend the instructions and follow them accurately.
Include visuals if necessary: Use screenshots, images, or videos to illustrate complex procedures or concepts. Visual aids can significantly enhance user understanding and facilitate issue resolution.
Regularly update and maintain the FAQ articles: As technology and user needs evolve, it's crucial to keep the FAQ articles up to date. Perform reviews to ensure that the information provided remains accurate and relevant. This involves verifying the solutions, updating any changed steps or interfaces, and incorporating new queries that arise over time.
Automation
One key area where automation can be applied is in ticket creation. Rather than relying on manual ticket creation by support agents, organizations can leverage automation to automatically generate tickets based on predefined triggers or events. For example, when a user sends an email to a designated support email address or fills out a form on the self-service portal, an automated workflow can be triggered to create a ticket and assign it to the appropriate team or agent.
By automating ticket creation, organizations can eliminate the need for manual data entry, reduce the risk of human error, and ensure that every request is captured and properly tracked. This not only saves time and effort for support agents but also enables faster response and resolution times for users.
Custom Workflows
In addition to ticket creation, organizations can also create custom workflows that align with their specific service desk requirements. Custom workflows define the sequence of actions and tasks that need to be performed for different types of requests or issues. For example, a custom workflow for a hardware issue might involve steps such as initial diagnosis, checking warranty status, coordinating with procurement for replacement parts, and scheduling a technician visit.
By defining custom workflows, organizations can ensure that requests are handled consistently and efficiently, with clear guidelines for support agents to follow. This reduces the risk of errors, ensures timely escalation and resolution of issues, and enhances overall service quality.
Integration Capabilities
An ideal enterprise service desk solution should have seamless integration capabilities with existing enterprise ticketing systems such as ServiceNow, Cherwell, Jira, SolarWinds and more.
By integrating with existing ticketing systems, the service desk solution can automatically create and update tickets, ensuring that all requests and issues are properly tracked and managed. This eliminates the need for manual data entry and reduces the risk of errors or missed tickets.
Integration also enables the service desk to access and leverage information from other systems, such as asset management or incident management tools. This provides support agents with a comprehensive view of the user's environment, allowing for faster and more accurate troubleshooting.
Custom Reporting and Analytics
Reporting and analytics provide valuable insights into the performance of the service desk, agent productivity, common issues, and user satisfaction. However, relying solely on pre-built reports may not fully address the unique reporting needs of every organization. That's where the importance of creating custom reports comes in.
Custom reports allow organizations to tailor their reporting capabilities to their specific requirements and goals. They can be designed to capture and analyze data points that are most relevant to the organization's operations and objectives. For example, a custom report may focus on tracking the resolution time of high-priority tickets or measuring customer satisfaction scores for different support channels.
Creating custom reports enables IT managers to gain deeper visibility into the performance and effectiveness of their service desk. They can identify trends, bottlenecks, and areas for improvement, which can inform decision-making and drive operational efficiency. Custom reports also facilitate data-driven conversations with stakeholders, such as upper management or other departments, to demonstrate the value and impact of the service desk.
Moreover, custom reports can help organizations meet compliance requirements and demonstrate adherence to service level agreements (SLAs). They can track and measure SLA metrics, such as response and resolution times, and provide evidence of compliance with contractual obligations.
Live Agents Assistance: Ensuring Efficient Issue Resolution through Skilled-Based Routing
While AI-powered automation can handle a wide range of requests and issues, there are instances where the expertise and problem-solving abilities of live agents are crucial. That's where the ability to route issues to the right agents with the necessary skills becomes essential.
With an enterprise service desk solution, IT managers can configure intelligent routing rules to direct employees looking for help to the most qualified agents. This ensures that the right people are assigned to handle specific types of issues.
Agent grouping based on skills allows organizations to create teams or departments with specialized knowledge in different areas. For example, there could be a team focused on network-related issues, another specializing in software troubleshooting, and so on.
By routing issues to agents with the appropriate skills, organizations can provide a higher level of support and ensure that complex or critical problems are handled by experts. This not only enhances customer satisfaction but also reduces the need for escalations or transfers between agents, saving time and effort for both users and support staff.
Moreover, the ability to route issues based on agent availability and workload helps distribute the workload evenly, preventing bottlenecks and ensuring a balanced distribution of issues among agents.
Customization and Personalization
Branding and Logo: Adding branding elements, such as a company logo and colors, to the service desk interface helps create a cohesive and familiar user experience. It reinforces the organization's identity and promotes brand recognition. Users will feel more connected to the organization when they see familiar branding elements, which can enhance their overall satisfaction with the service desk.
Custom Workflows: A customizable service desk solution allows IT managers to design workflows that align with their organization's unique processes and requirements. They can create custom forms, fields, and workflows, enabling users to submit requests or report issues in a way that makes sense for their specific needs. Custom workflows ensure that the service desk solution adapts to the organization's existing processes, rather than forcing users to conform to a rigid system.
Tailored Responses (Custom Adaptive Cards): Personalized responses from the service desk, such as automated email notifications or chatbot interactions, create a more engaging and human-like experience for users. IT managers can customize the language, tone, and messaging of these responses to match their organization's voice and style. This personal touch can help build trust and rapport between users and the service desk, making them feel valued and understood.
Conclusion
As the number of users and support requests increases, the solution should be able to handle the additional workload without sacrificing performance or user experience.
Summary:
AI capabilities in a service desk solution streamline ticket routing and automate self-service, improving efficiency and reducing the burden on support staff.
Custom reporting and analytics provide valuable insights for continuous improvement and optimization of IT support processes.
Custom chat workflows within Microsoft Teams enable seamless collaboration and communication between support agents and users.
Live agents play a crucial role in a service desk solution, providing personalized support and expertise to users who require direct assistance.
By leveraging these capabilities, IT managers can transform their help desk into a proactive and efficient support system that meets the needs of their organization and contributes to overall business success.
Improve Support Workflow With Microsoft Teams
Integrate Your AI-Driven Help Desk With Teams

Enterprise service desk displays welcome card (adaptive card) within the MS Teams application
Chat with your service desk using Microsoft Teams and build chatbots, FAQs, and route to agents - all using a SaaS application
Introduction: Exploring the Benefits
Many of our customers come to us with the requirement ‘our employees spend a lot of time using Microsoft Teams, can we also use Microsoft Teams to allow our employees to chat with our service desk?’ Chime V5 is designed to allow employees to use Microsoft Teams to quickly connect to your enterprise service desk - and use AI to help with common questions.
Before delving into the details of how to use Microsoft Teams as a help desk, let's first understand the reasons behind utilizing this platform. Microsoft Teams offers some advantages, including:
Seamless integration: By using Microsoft Teams, employees can seek support without having to switch to a different application. This is particularly beneficial as Teams is already widely utilized for chat, meetings, and collaboration.
Simplified ticketing process: Unlike traditional methods, employees no longer need to create tickets and wait for help. Instead, they can initiate a chat to receive immediate assistance. The service desk will then handle the routing process, directing queries to appropriate agents or providing self-service options through artificial intelligence.
Ease of deployment for IT managers: The integration of the service desk within Microsoft Teams simplifies the deployment process for IT managers. Service desk solution can be deployed to Teams environment to all employees within organization quickly from Teams Admin Dashboard. Pin the service desk app to Teams navigation to make accessing it just one click away.
No training required for end users: Another benefit of using Microsoft Teams as a help desk is that end users do not need any additional training. Since Teams is already a familiar platform for most employees, they can easily navigate and use the service desk without any learning curve. This eliminates the need for extensive training sessions, saving time and resources for IT managers.
How to use Microsoft Teams as help desk for your organization
Design your help desk workflow
Picture a scenario where a user seeks assistance. What happens afterwards? The key to providing effective support lies in having a well-structured help desk workflow. The task is to establish a system that seamlessly handles questions, directing them to the appropriate agents or providing self-service alternatives. It might be beneficial to collect essential information before redirecting to AI or live agents. The capability to personalize this procedure is crucial, guaranteeing that it perfectly matches the needs of your organization.
Integrate your help desk with your ticketing system
Typical ticketing procedures usually require manual actions, which can cause delays. The objective is to smoothly combine your customer support platform with your ticketing system. The aim is to make it extremely easy to create tickets, whether it occurs before a chat or automatically following a conversation. As a result, customers receive faster assistance without the inconvenience of manually inputting data.
Connect employees to designated service desk agents
One important aspect that your help desk should offer is the ability to direct users to the appropriate support agents. It is essential to have skilled agents who can effectively handle specific issues. Your help desk will have the capability to direct users to agents based on their expertise. For instance, when it comes to inquiries about resetting passwords, they will be connected to agents with expertise in "IT Problems," or users should be connected with agents who can communicate in their preferred language. This efficient routing system guarantees that users receive prompt and best assistance.
Conclusion
In conclusion, integrating help desk with Microsoft Teams can greatly improve your organization's help desk system. By utilizing the familiar platform of Teams, employees can easily navigate and use the service desk without the need for extensive training.
To effectively use Teams as a help desk, it is important to design a well-structured conversational chat workflow that seamlessly handles user questions and directs them to the appropriate agents or self-service options. Additionally, integrating the help desk with your ticketing system can eliminate delays and make it easy to create tickets.
Lastly, connecting employees to designated support agents based on their expertise or preferred language ensures that users receive prompt and efficient assistance. Overall, ChimeV5's integration with Microsoft Teams provides a streamlined and efficient help desk solution for IT managers looking to improve their organization's support system.
Reduce Response Time With AI-Powered Support
Integrate Service Desk Chat With Chat GPT Support
Chime provides a chat based service desk - and many of our customers would like to deflect ‘simple’ questions to a chatGPT chat bot. This chatGPT instance may be either ‘private’ (indexing internal data), or public where the generic chatGPT service is used. Chime V5 can handle both of these conditions.
With this integration, Support Agents can now access the power of ChatGPT AI (via Azure OpenAI) to elevate their capabilities and deliver even more efficient customer support. Agent AI Assist provides an integrated AI assistant for the service desk agent. The service desk agent can request help, using agent assist, directly from the chat UI and one, or more, suggestions will be provided to the agent.
Expanded Knowledge: Azure OpenAI with ChatGPT provides access to a broad knowledge base and advanced problem-solving tools.
Faster Responses: AI-powered support streamlines troubleshooting, reducing response times and boosting satisfaction.
Reliable Solutions: AI effortlessly retrieves relevant knowledge and interactions, ensuring consistent responses.
Personalized Conversations: The AI's natural language understanding creates personalized and context-aware interactions.
Check out our short video above to see a demo on a password reset issue assisted by AI. More information on features, demos, and technical articles are available on our blog